Mobile dental application setting.
We have created an intuitive and user-friendly mobile app specifically designed for individual dental practices. However, there are a few points that require attention during setup and use. Below, we will explain how to set up the app for efficient operation in just a few minutes.
This page covers the settings and the most complex use cases of the application.
Settings area/
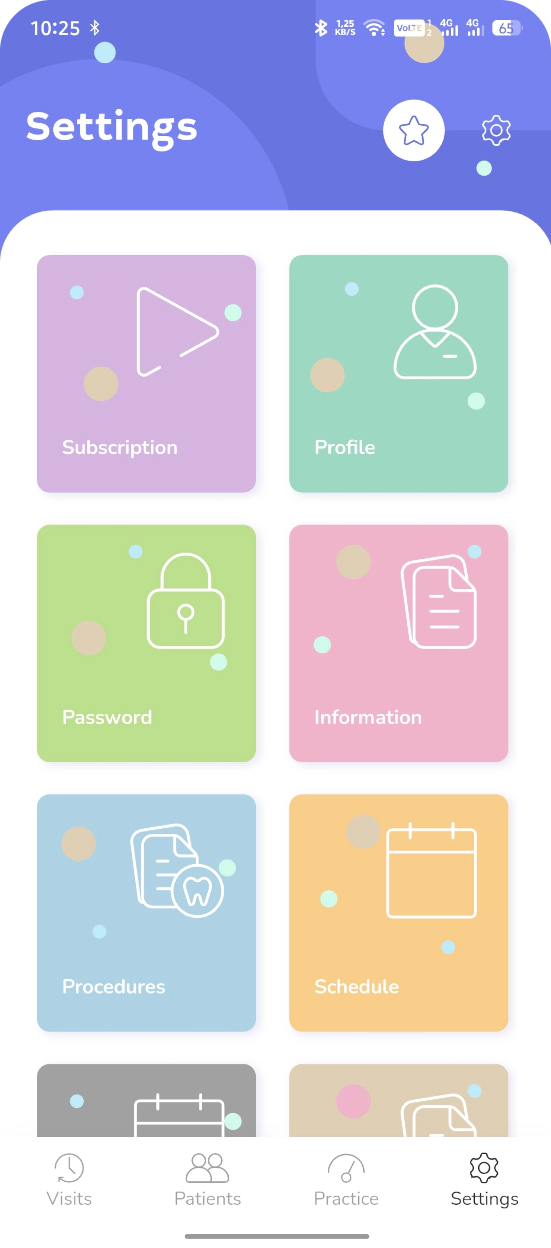
Start using the app by going to the Settings. This section includes the following features: Subscription Settings, Profile, Password, Information, Procedures, Scheduling, Working Hours, and User Agreement.
Subscription/
To pay for the subscription, select the payment period — 1 month or 1 year. Link your payment card. Then, choose Activate Subscription in the Subscription Status card.
After the trial period ends, you will see the subscription payment screen. Don’t worry — it’s just a reminder.
In this section, you can view your transaction history.
Profile/
In this section, you can set the account owner’s name, the slogan displayed at app startup, currency, choose the account icon color, email, interface language, and configure several Practice settings.
Use slots? — If this checkbox is enabled, working hours will be taken into account when creating an appointment. For example, if the workday starts at 9:00, the first slot in the slot grid will begin at 9:00.
Collaboration – when the collaboration feature is enabled, it becomes possible to select other doctors when assigning appointments.
Dictionaries/
These are metadata that help organize and structure practice data. For example, groups, templates, user-added patient card fields, document templates, and others.
It’s similar to adding a new tag to the data that indicates its belonging to a certain group or specifies which template to apply in a given case.
How to work with this metadata? If you include a patient in the Favorite Patients group, you will be able to see them in the search results for that patient group.
The following metadata are currently implemented in the app:
-
Patient Card – added fields in the card.
-
Patients – patient groups.
-
Payments – management of payment groups.
-
Insurances – adding insurance companies.
Procedures/
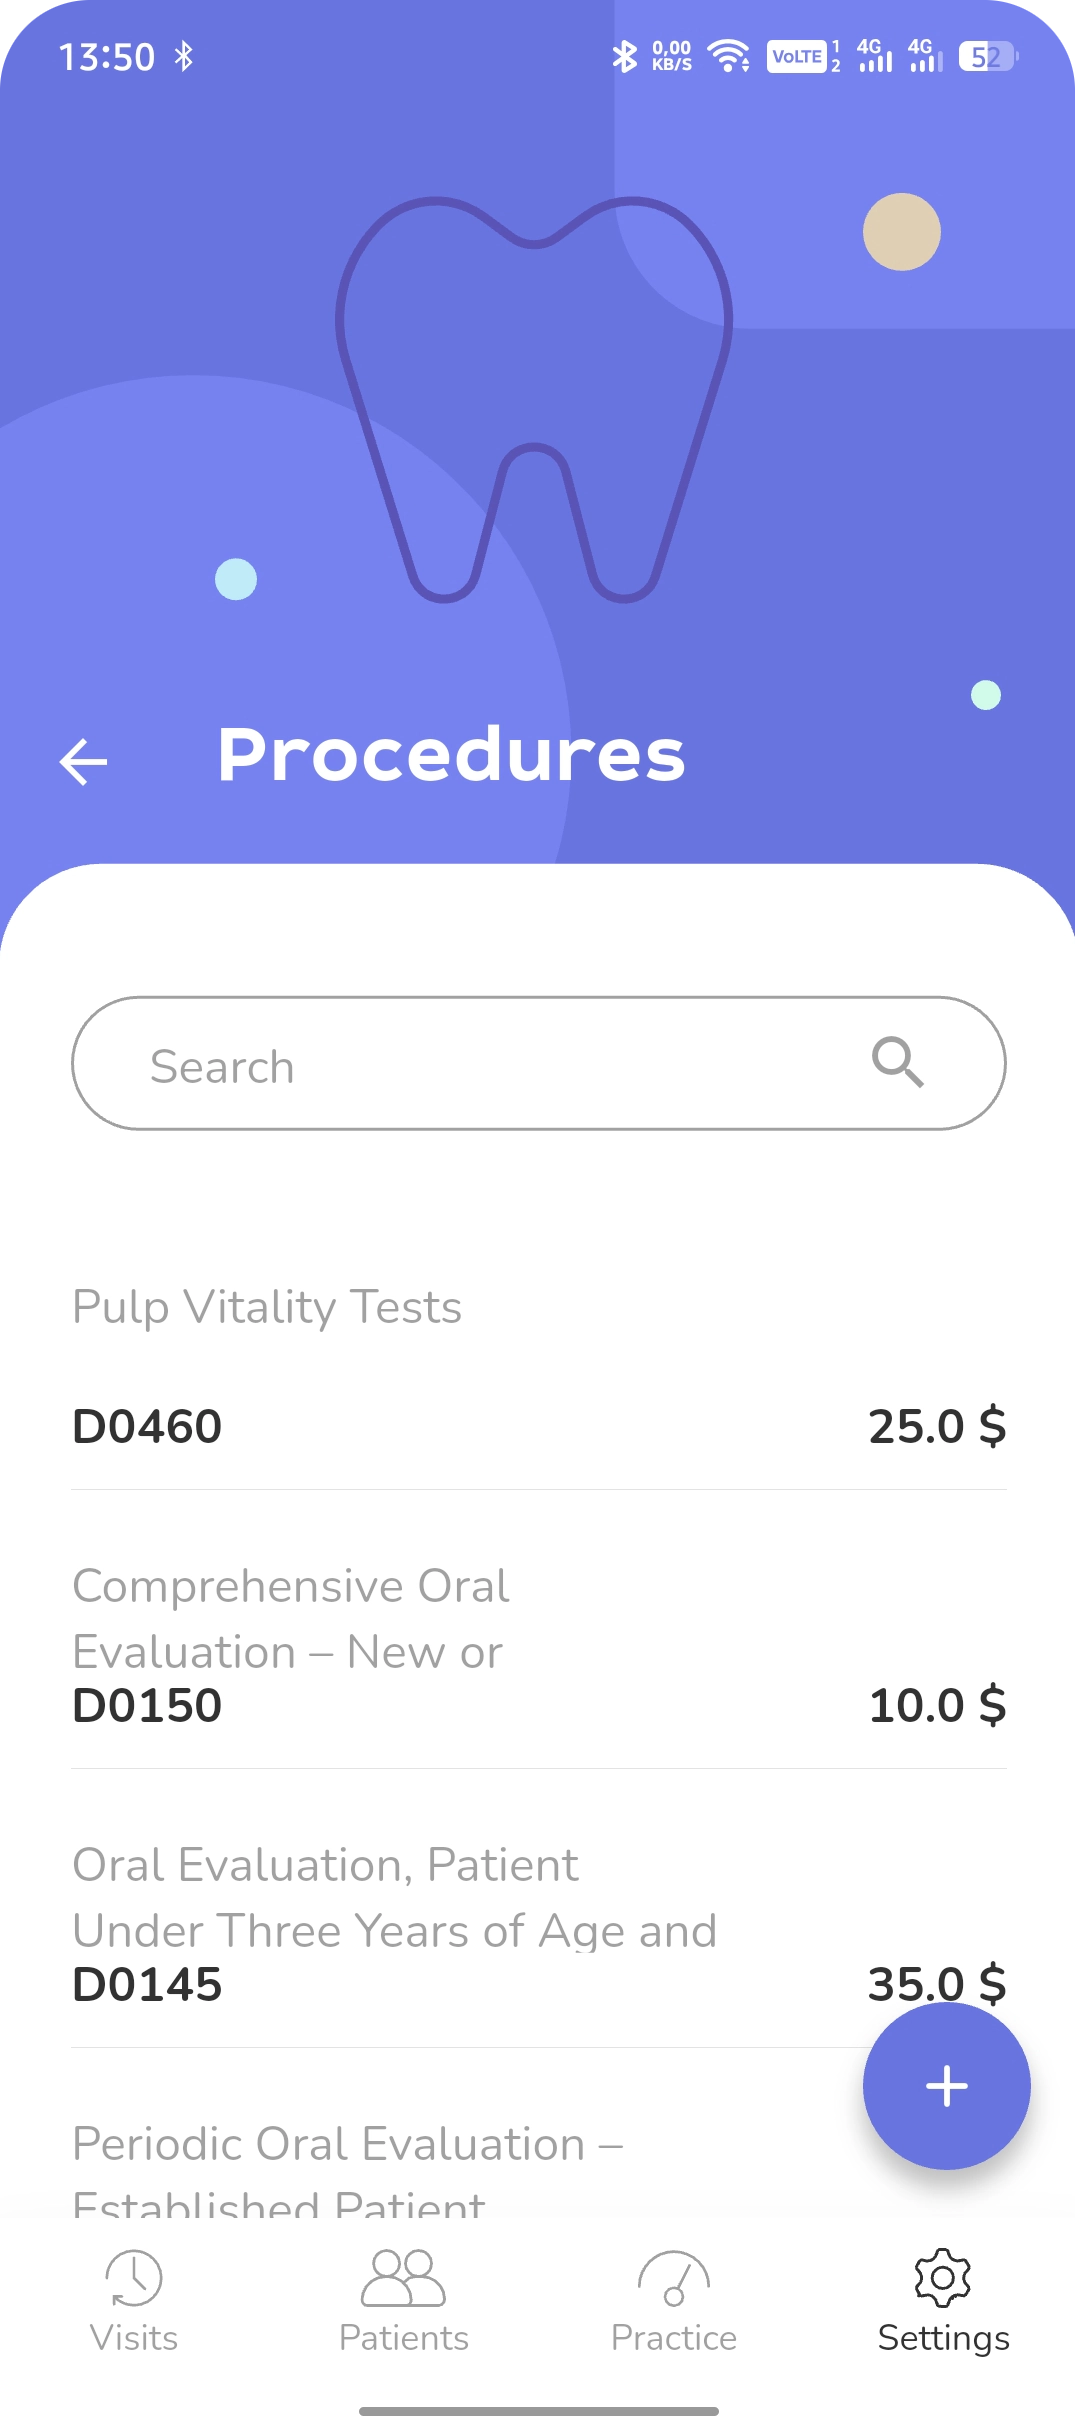
To demonstrate the app’s capabilities, we have already added several procedures.
Procedure fields: Procedure Name, Code, Category, Main fee. To create a new procedure, click the + icon and fill in all the fields. Then click the Save icon at the top of the app screen.
You can search for procedures in the list by any character or delete a procedure in edit mode.
Working hours/
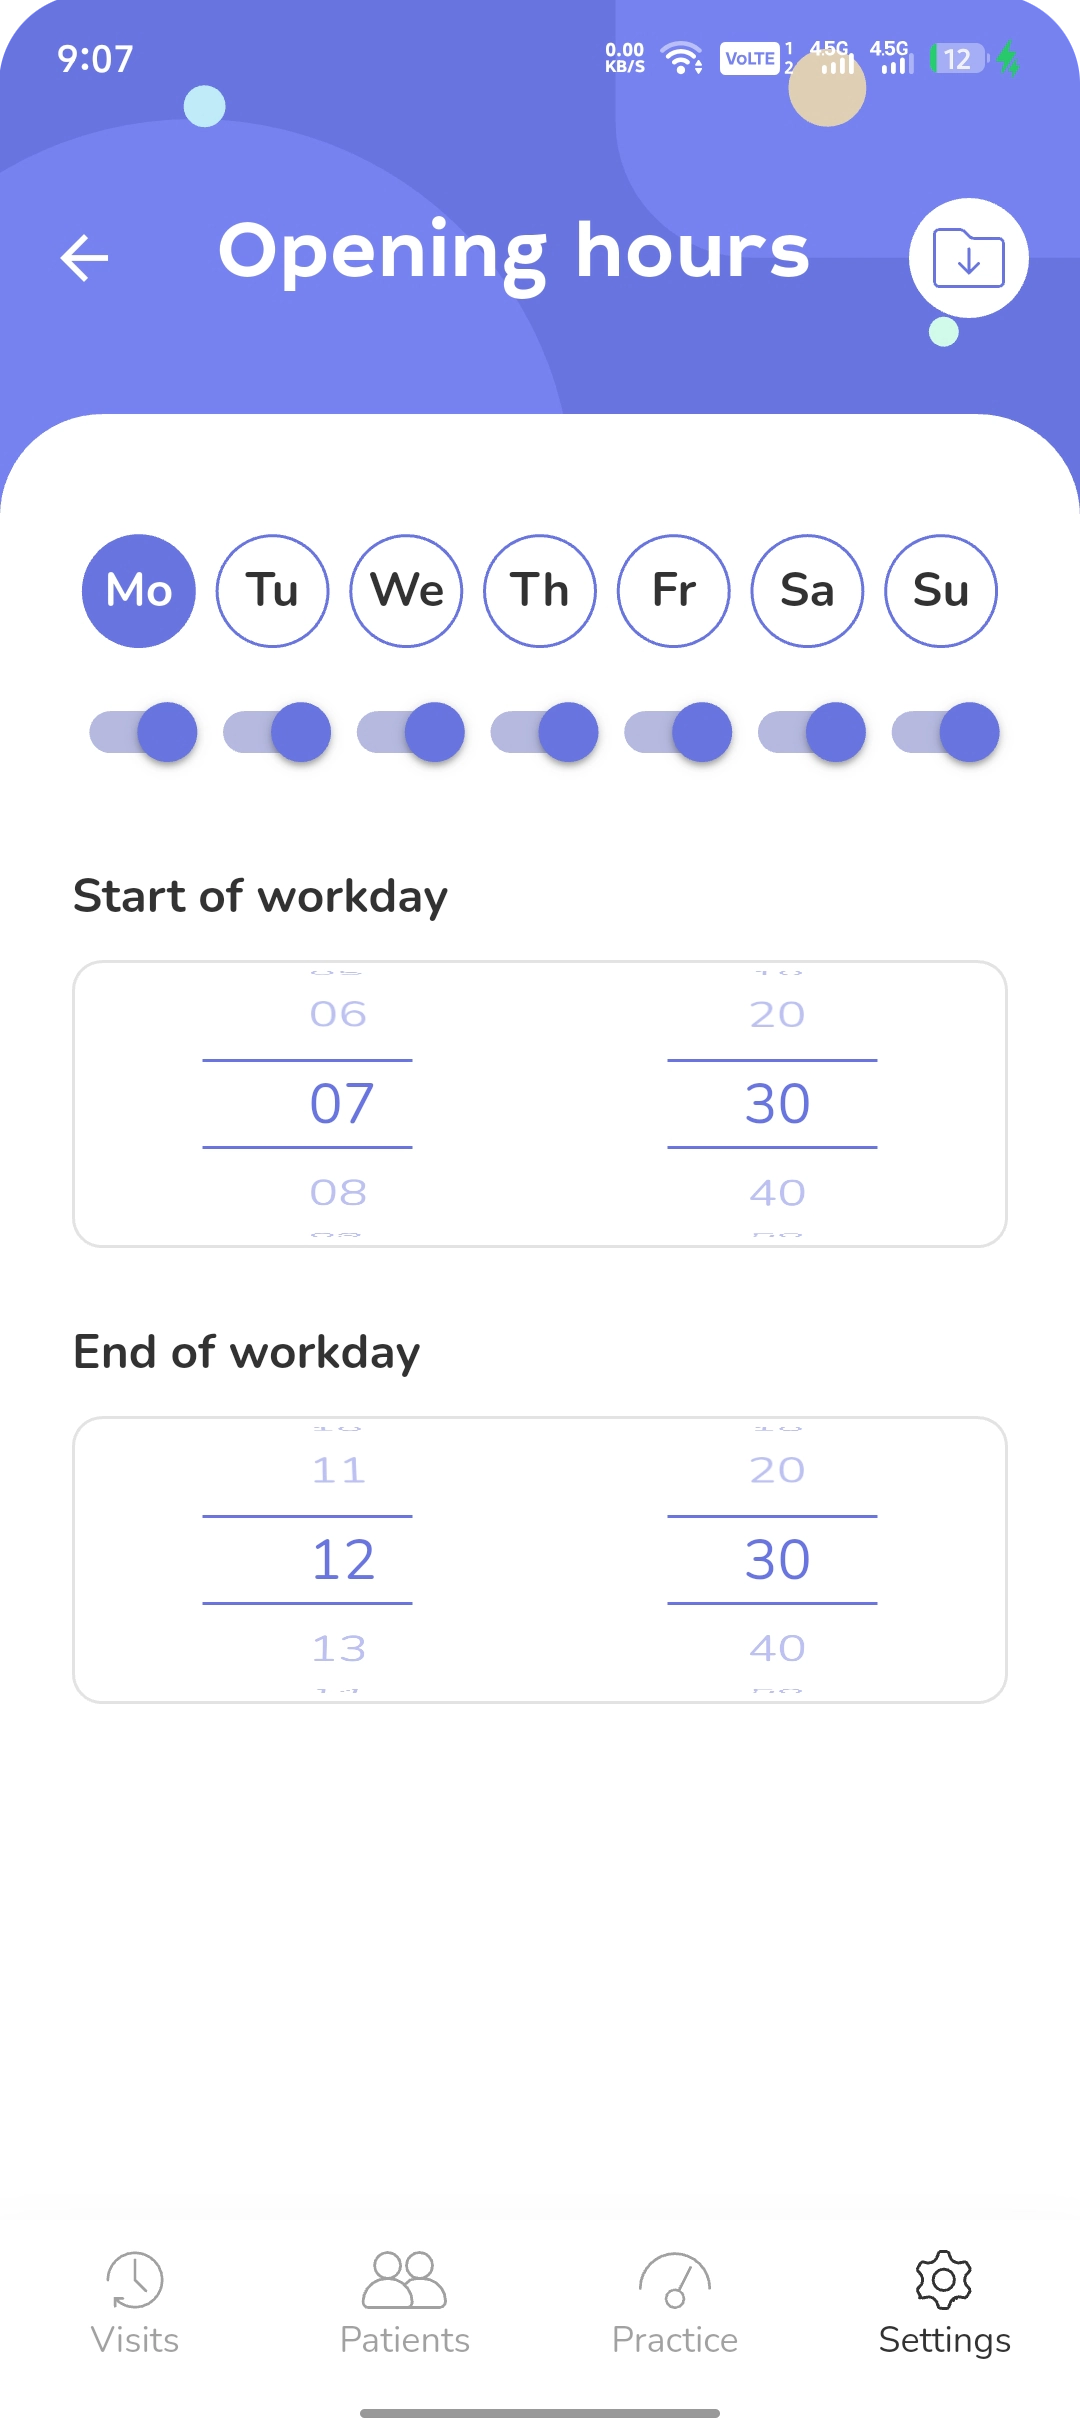
- Turn on the box to mark this day as a working day.
- Set the working hours interval for each day.
- Save the settings.
Appointment scheduling/
Schedule a patient appointment in a few simple steps. Please note that in the app’s collaborative mode, you can schedule appointments for other team members.
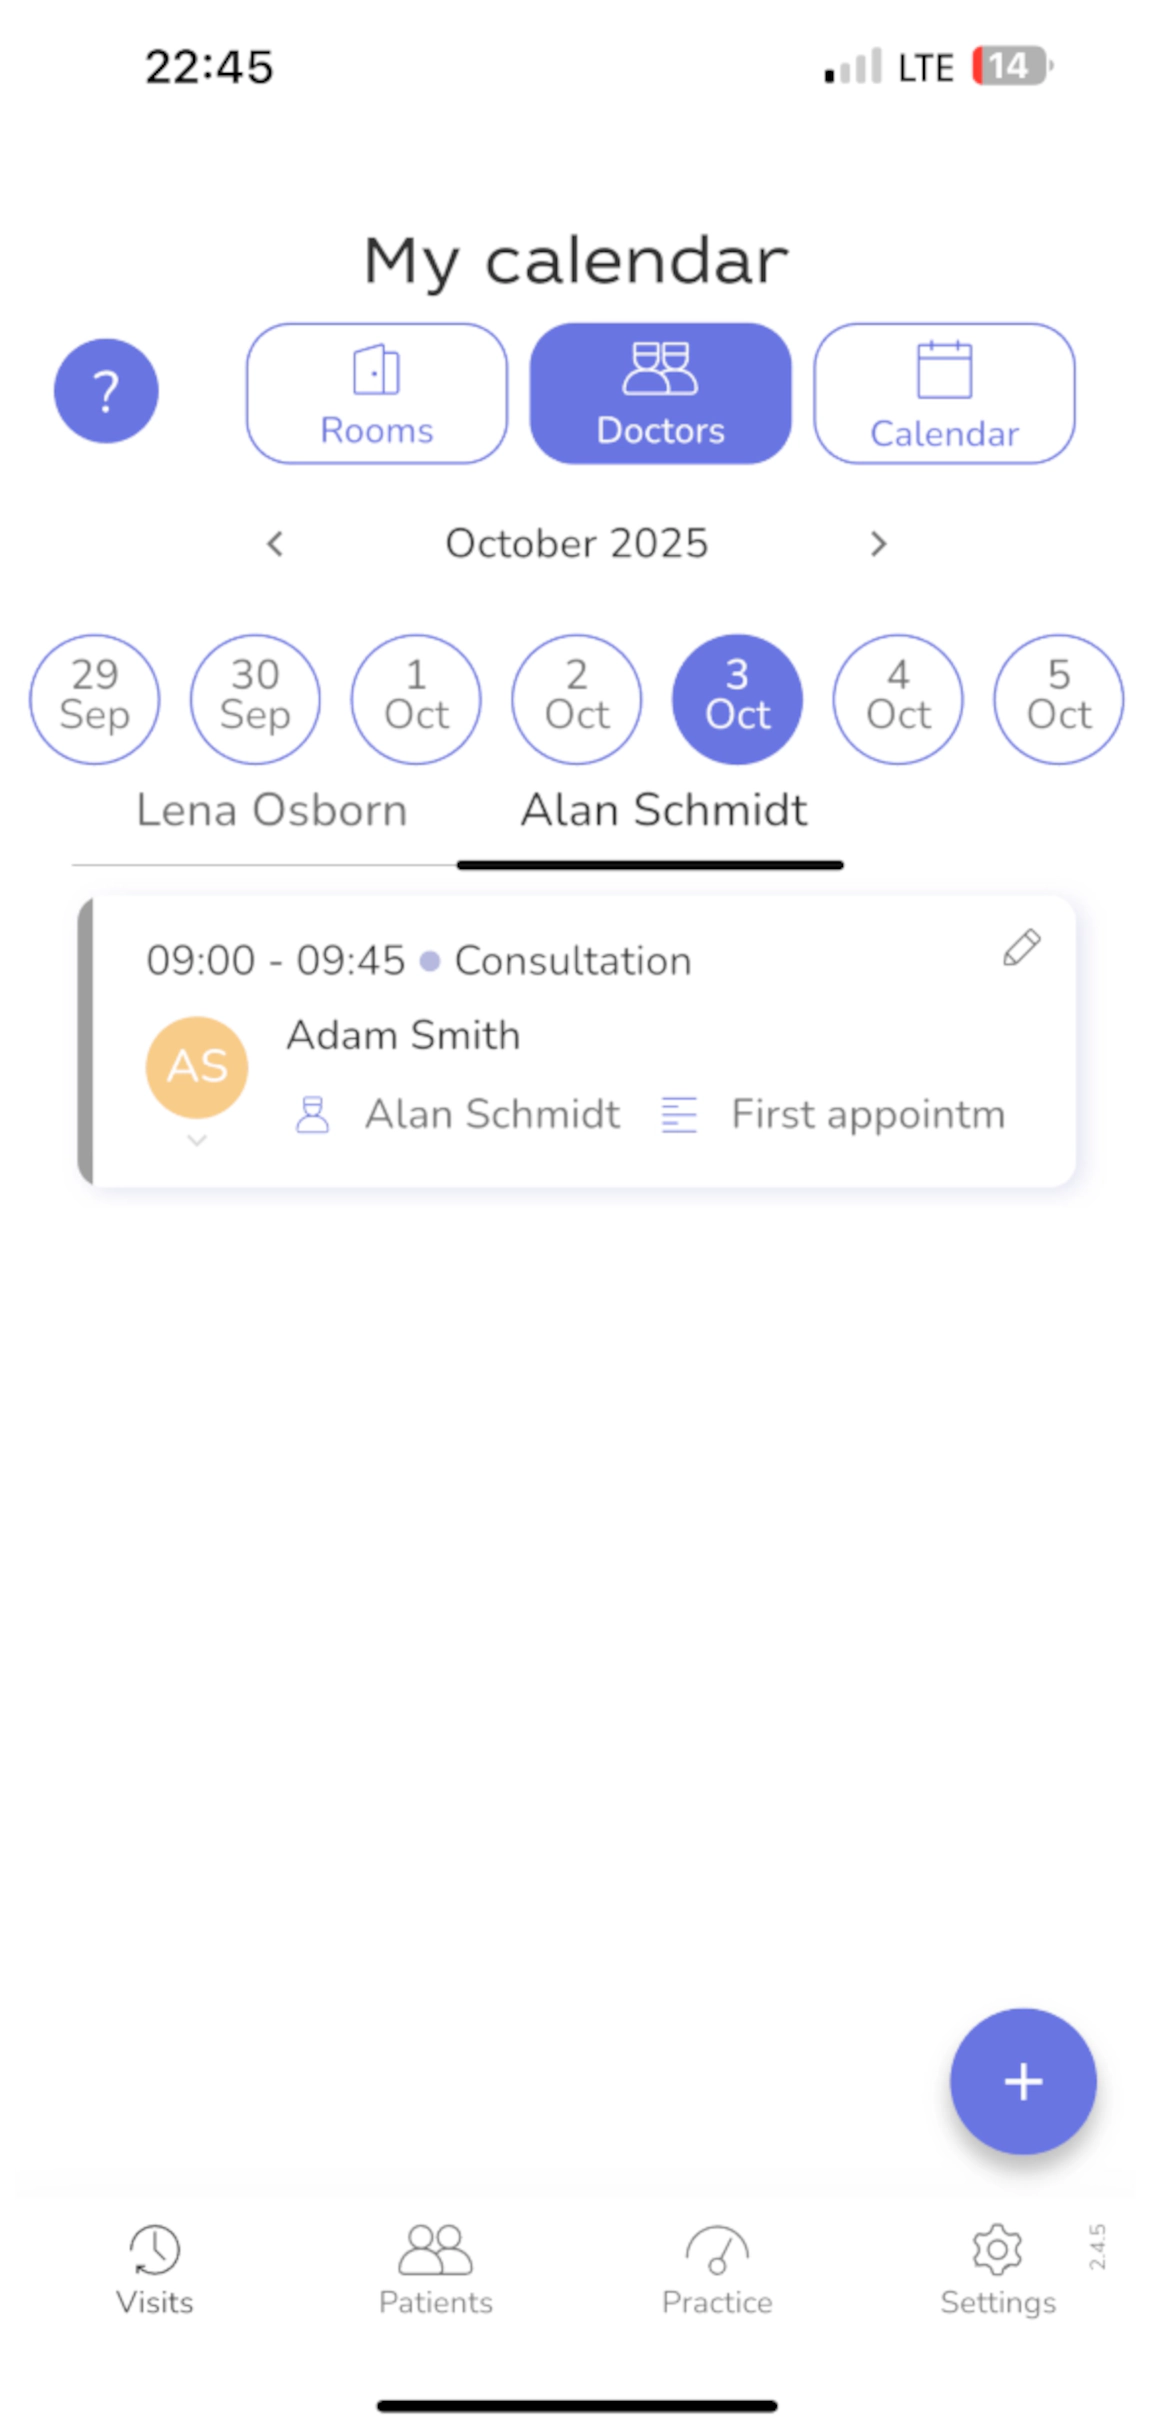
Visit card shows visit time, patient’s name, and note. Click the icon to view patient’s mini-profile.
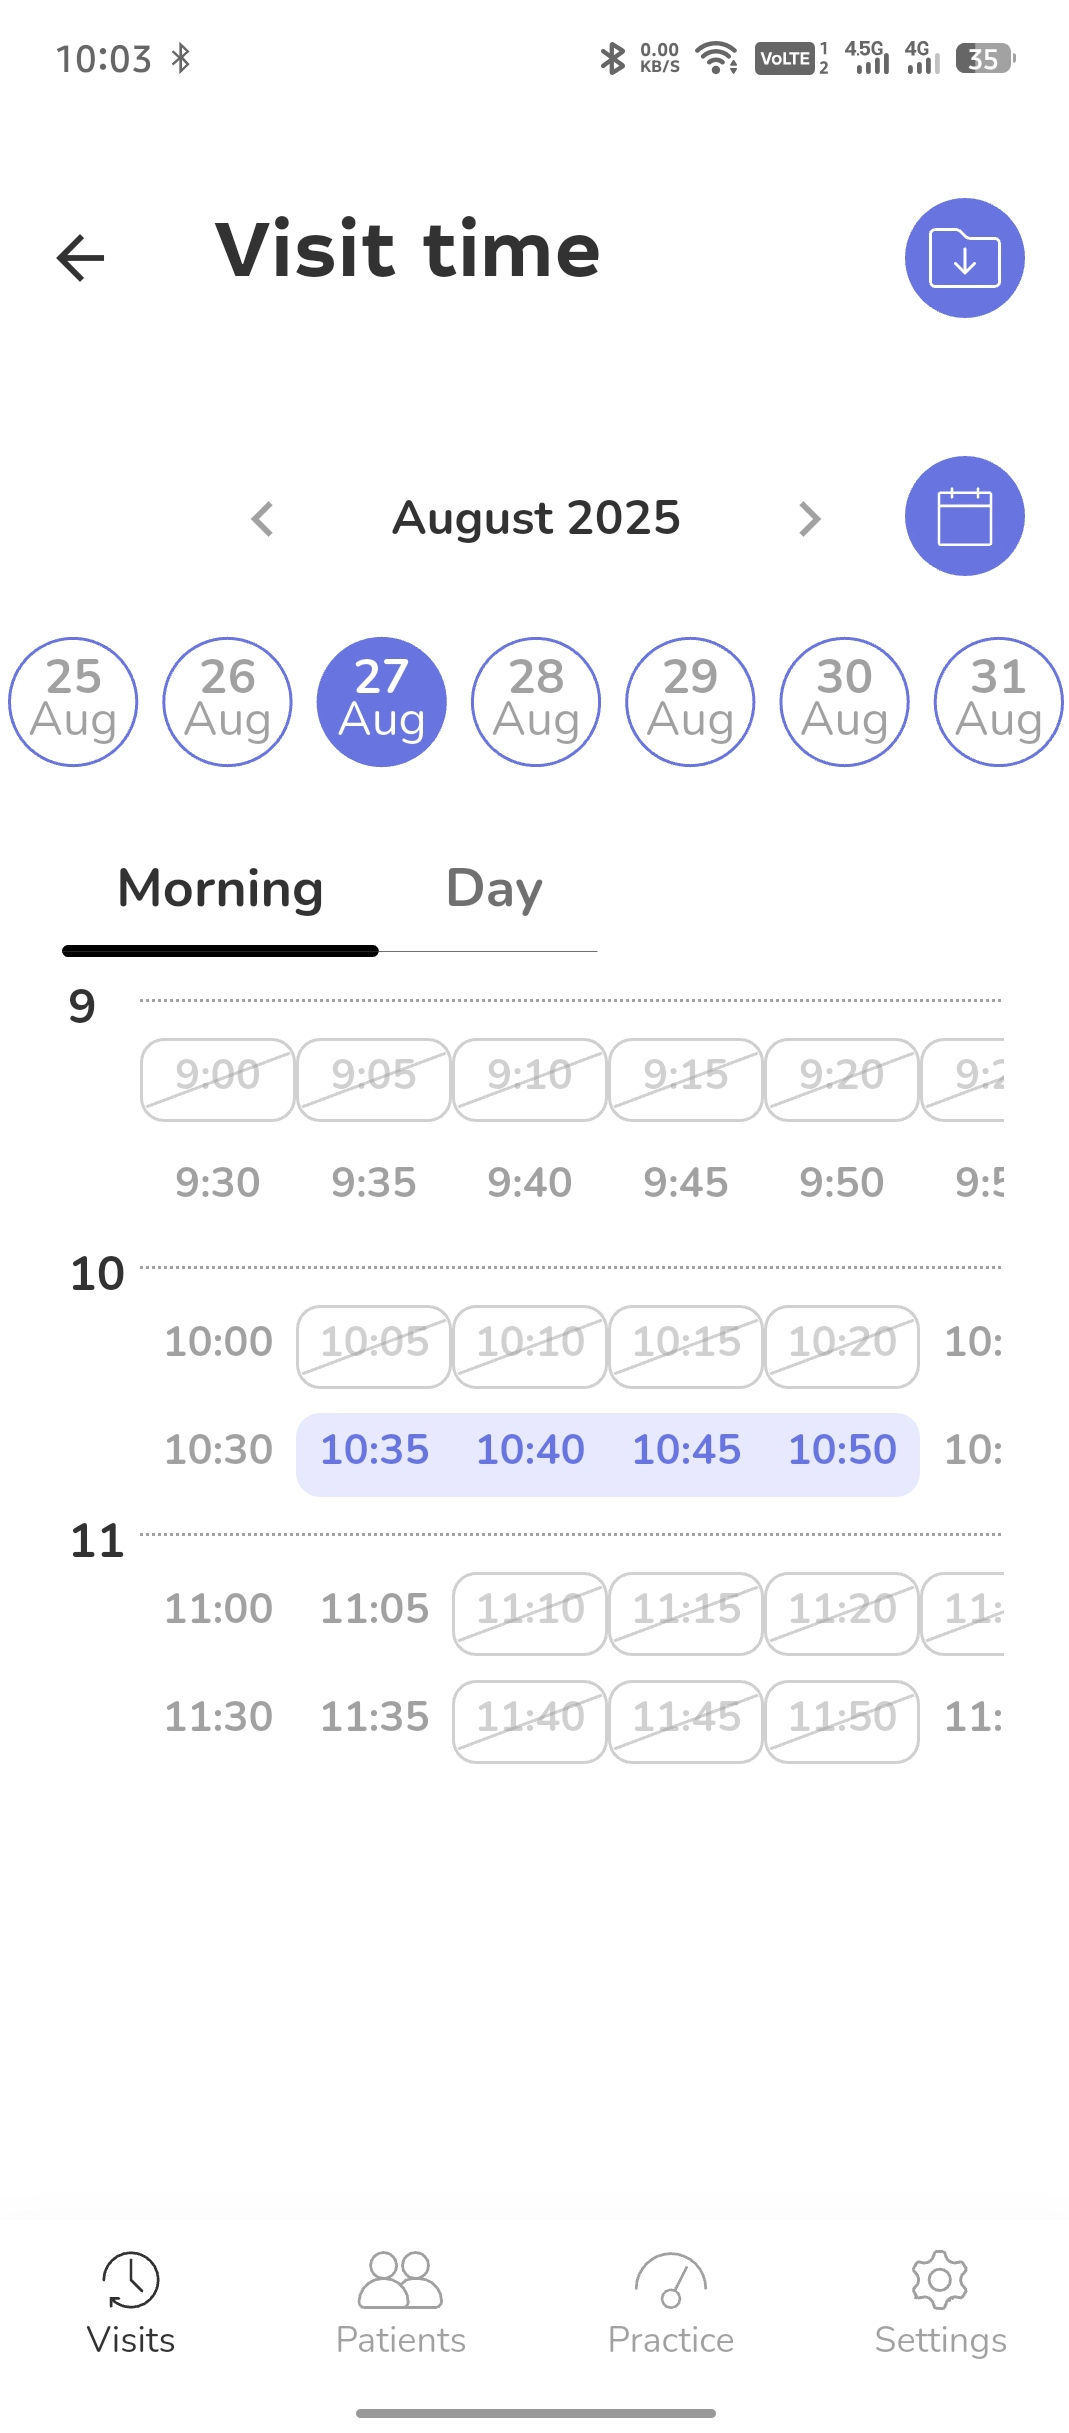
Select the desired appointment time slots carefully. One slot equals 5 minutes
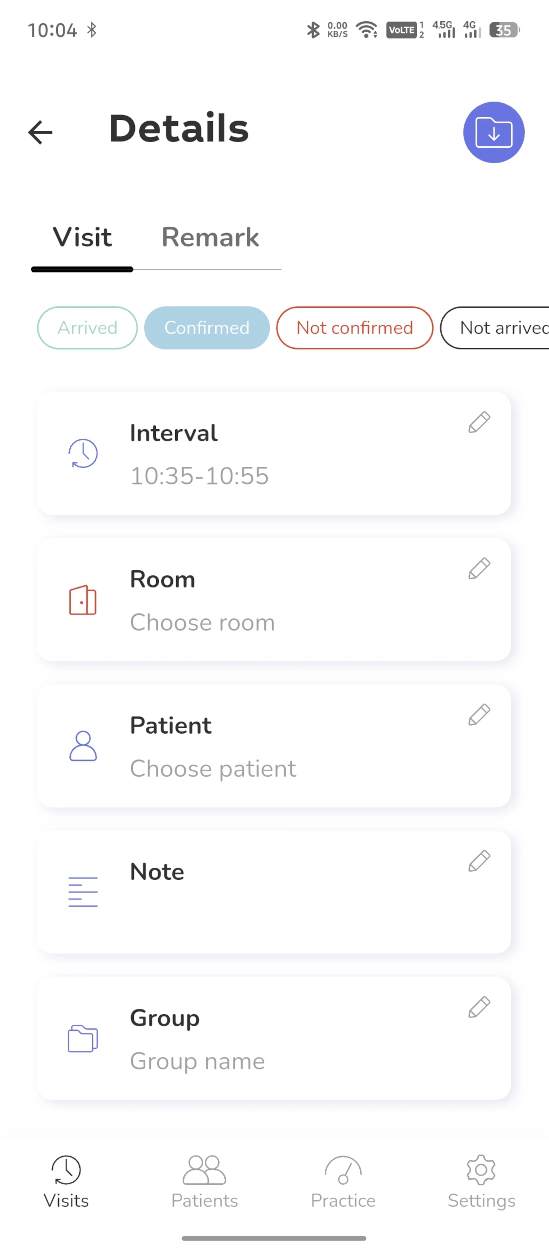
Fill in all the required appointment details. The list of data for input is presented on this screen
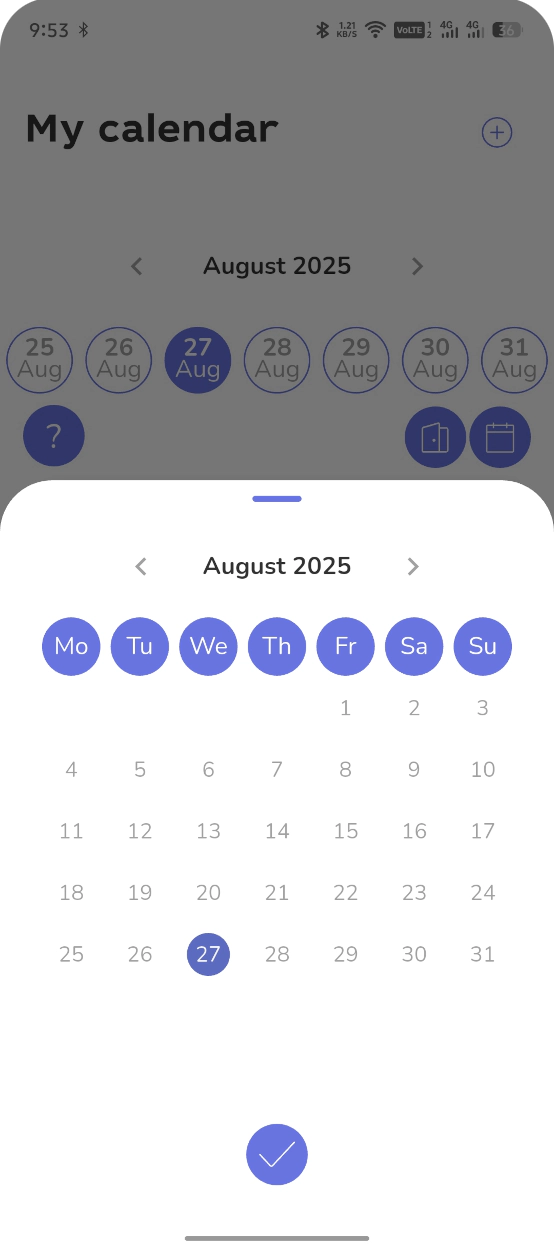
Use the mini calendar for quick date changes if needed.
Detailed guide on creating an appointment.
Schedule/
Create your work schedule for any period by repeating today’s schedule template at specified intervals.
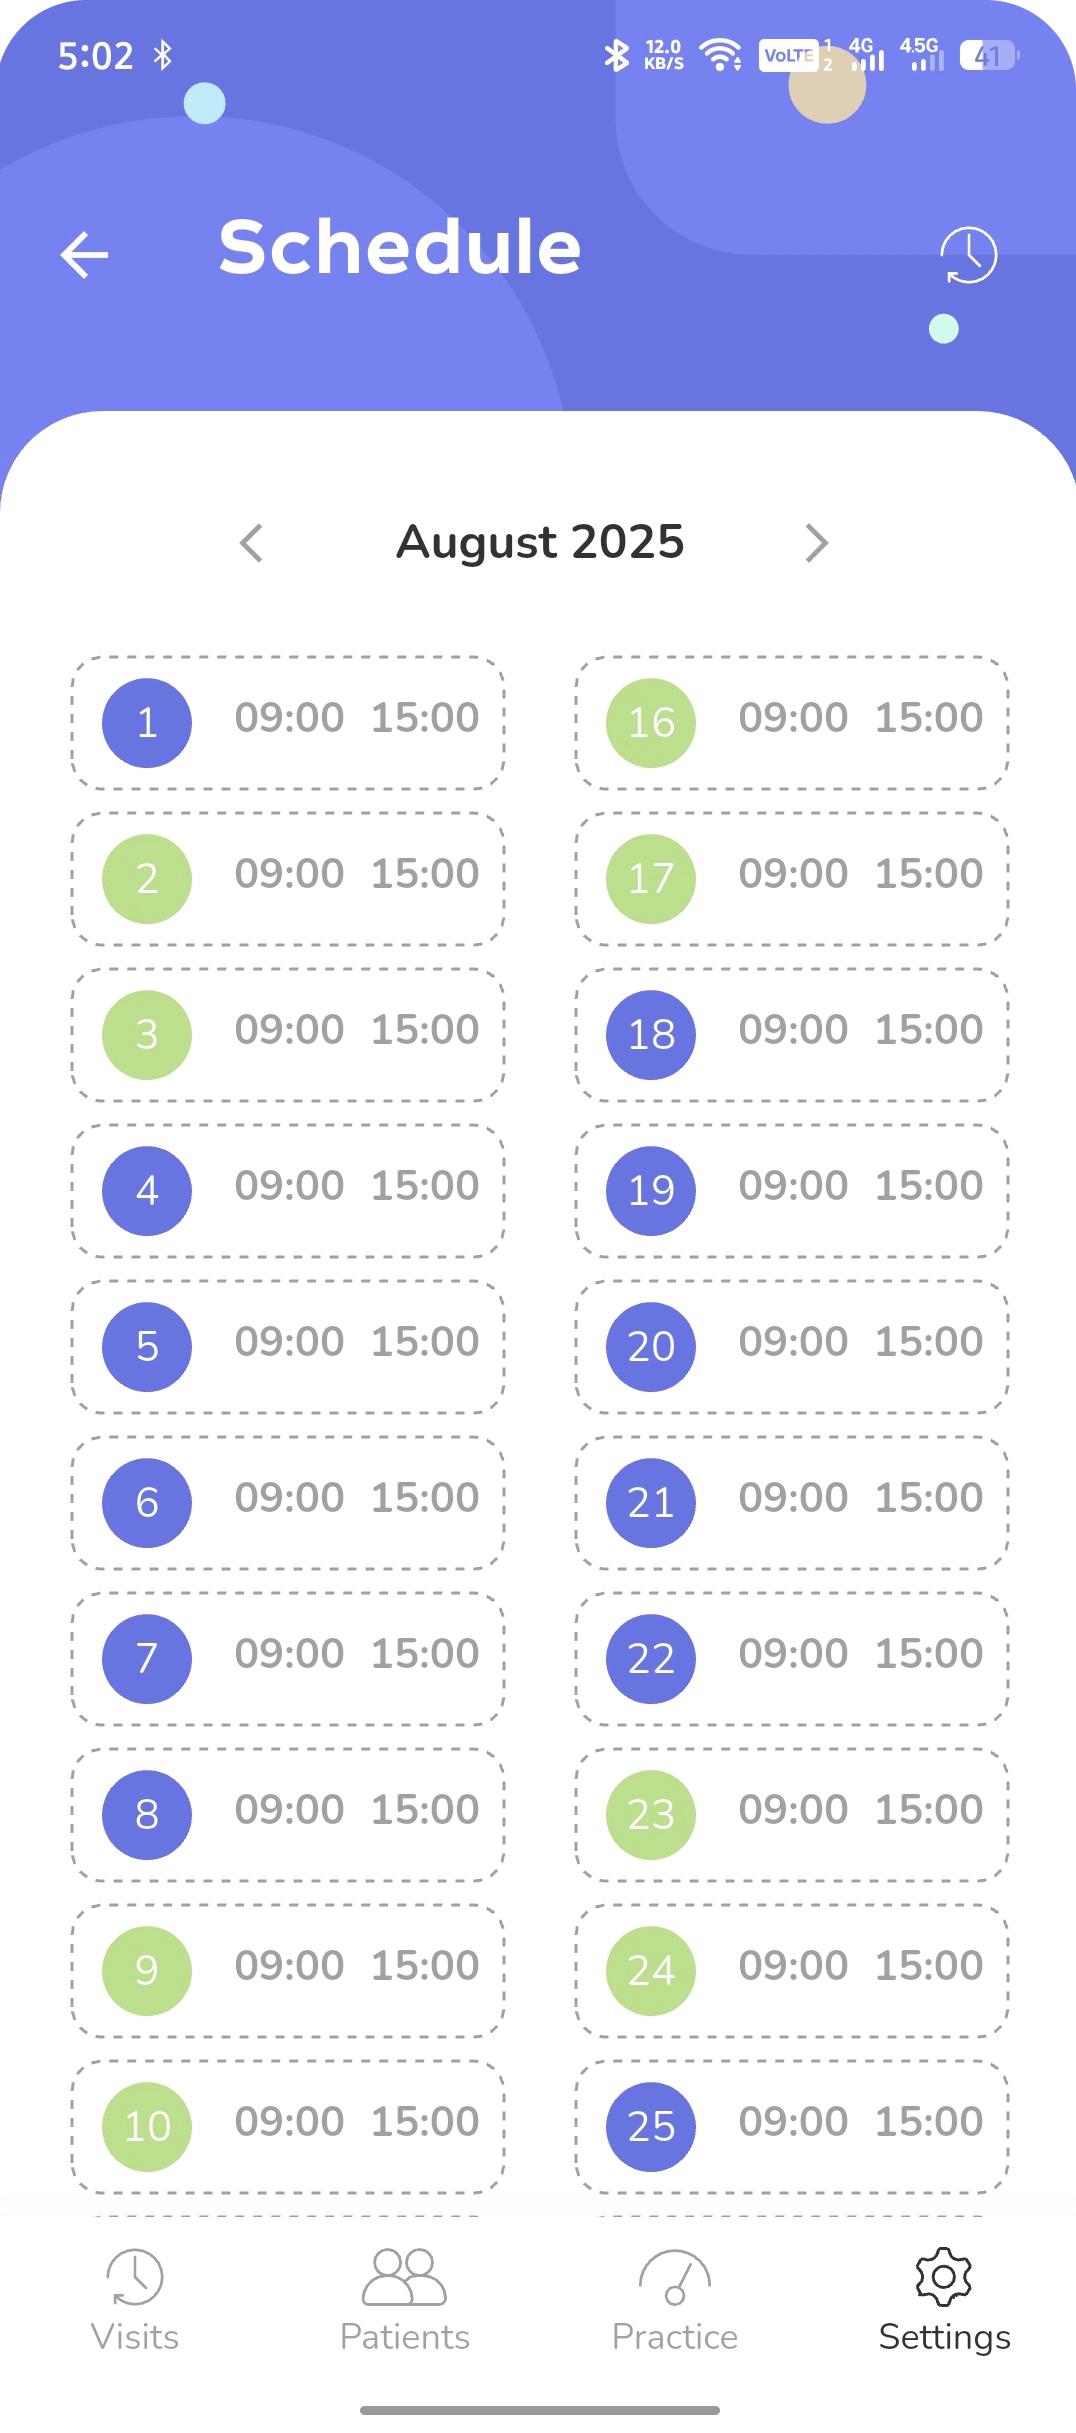
Select a planning date. Set your working hours first.
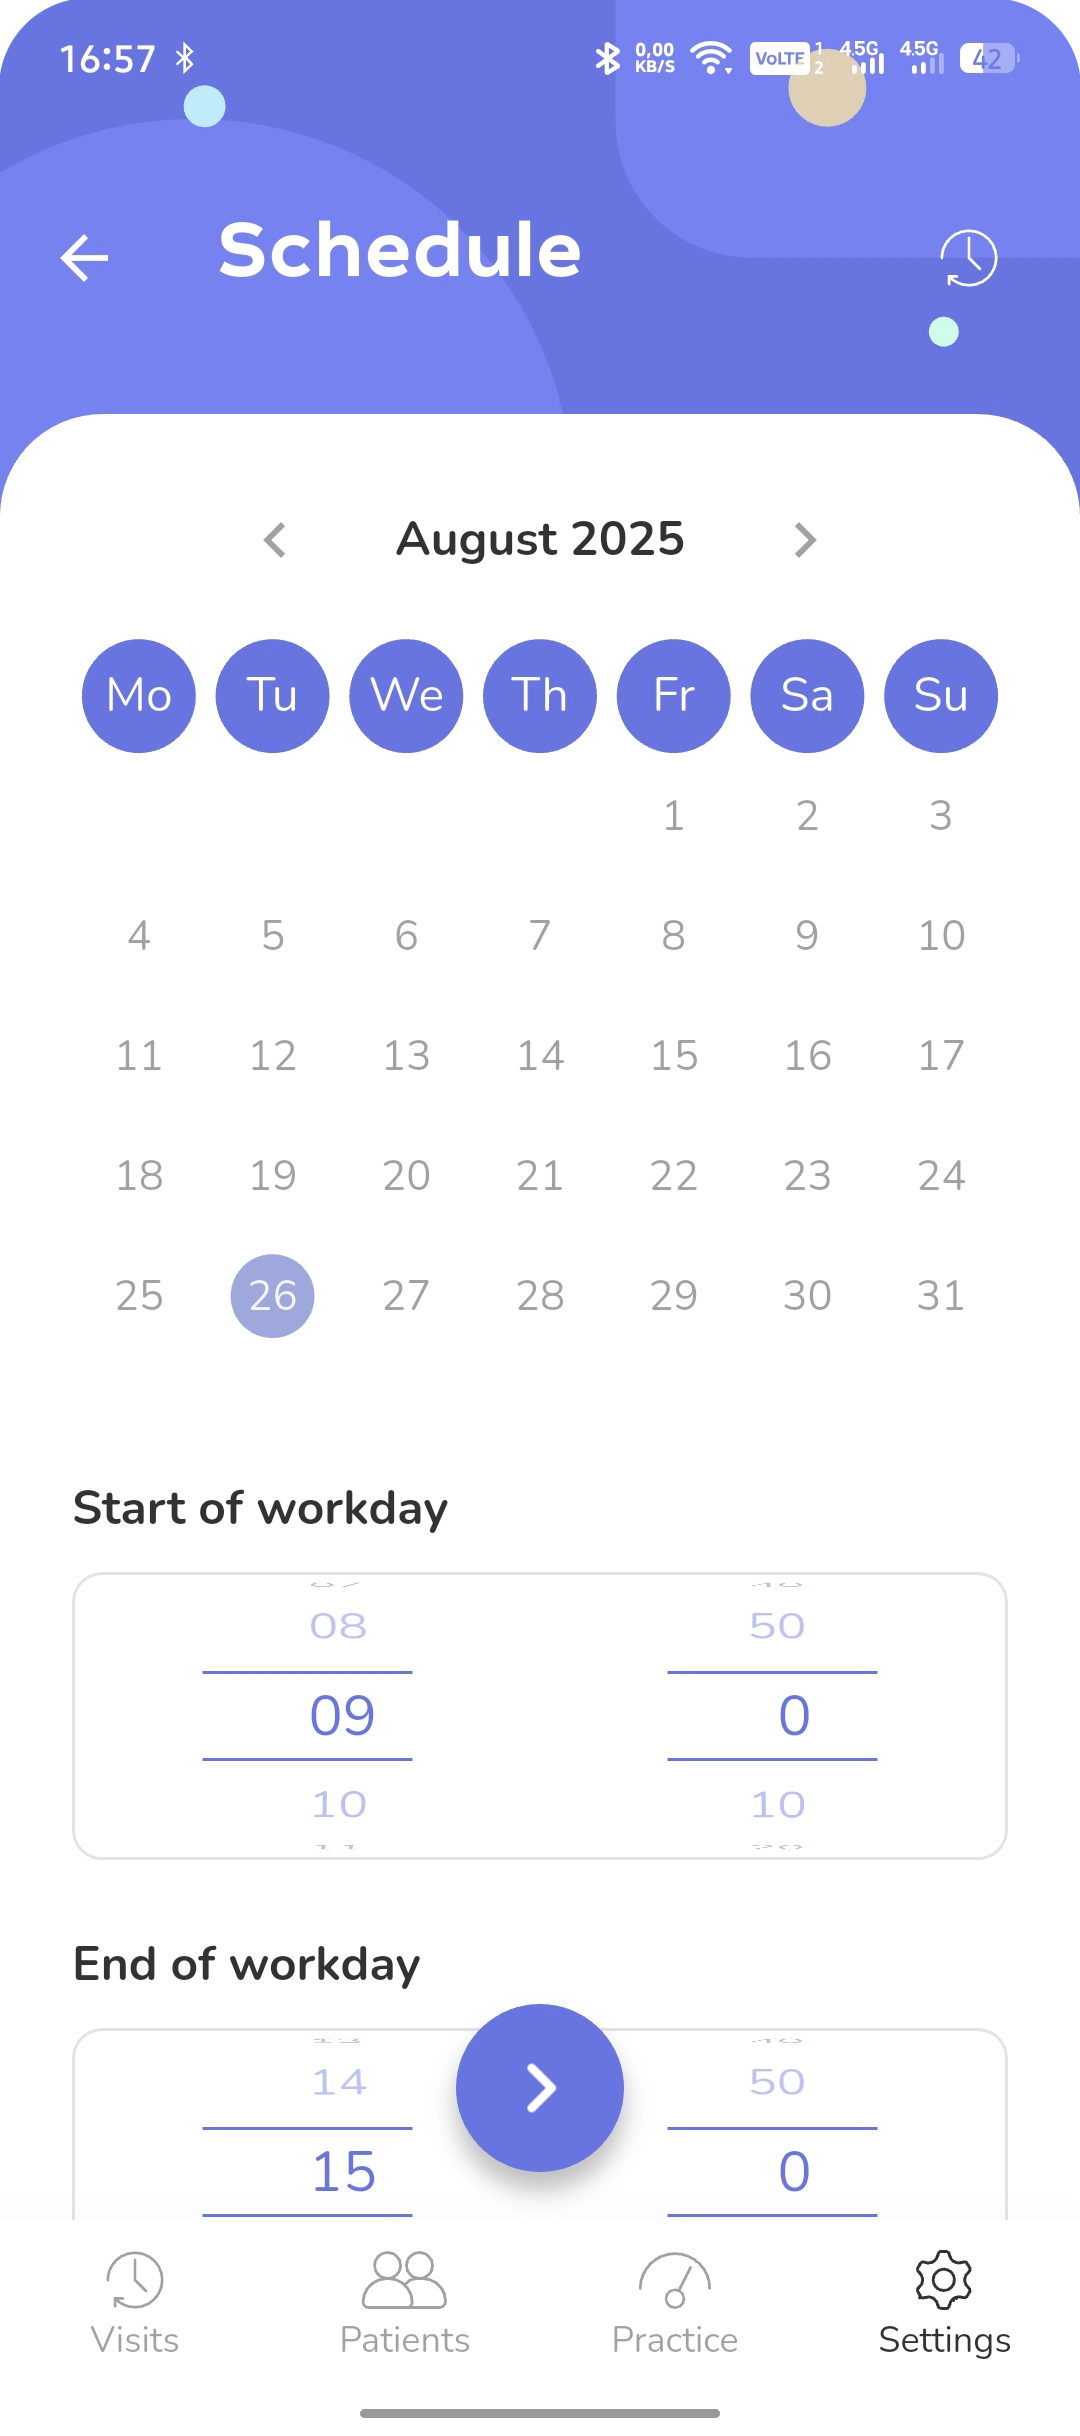
Specify the working time range for this day.
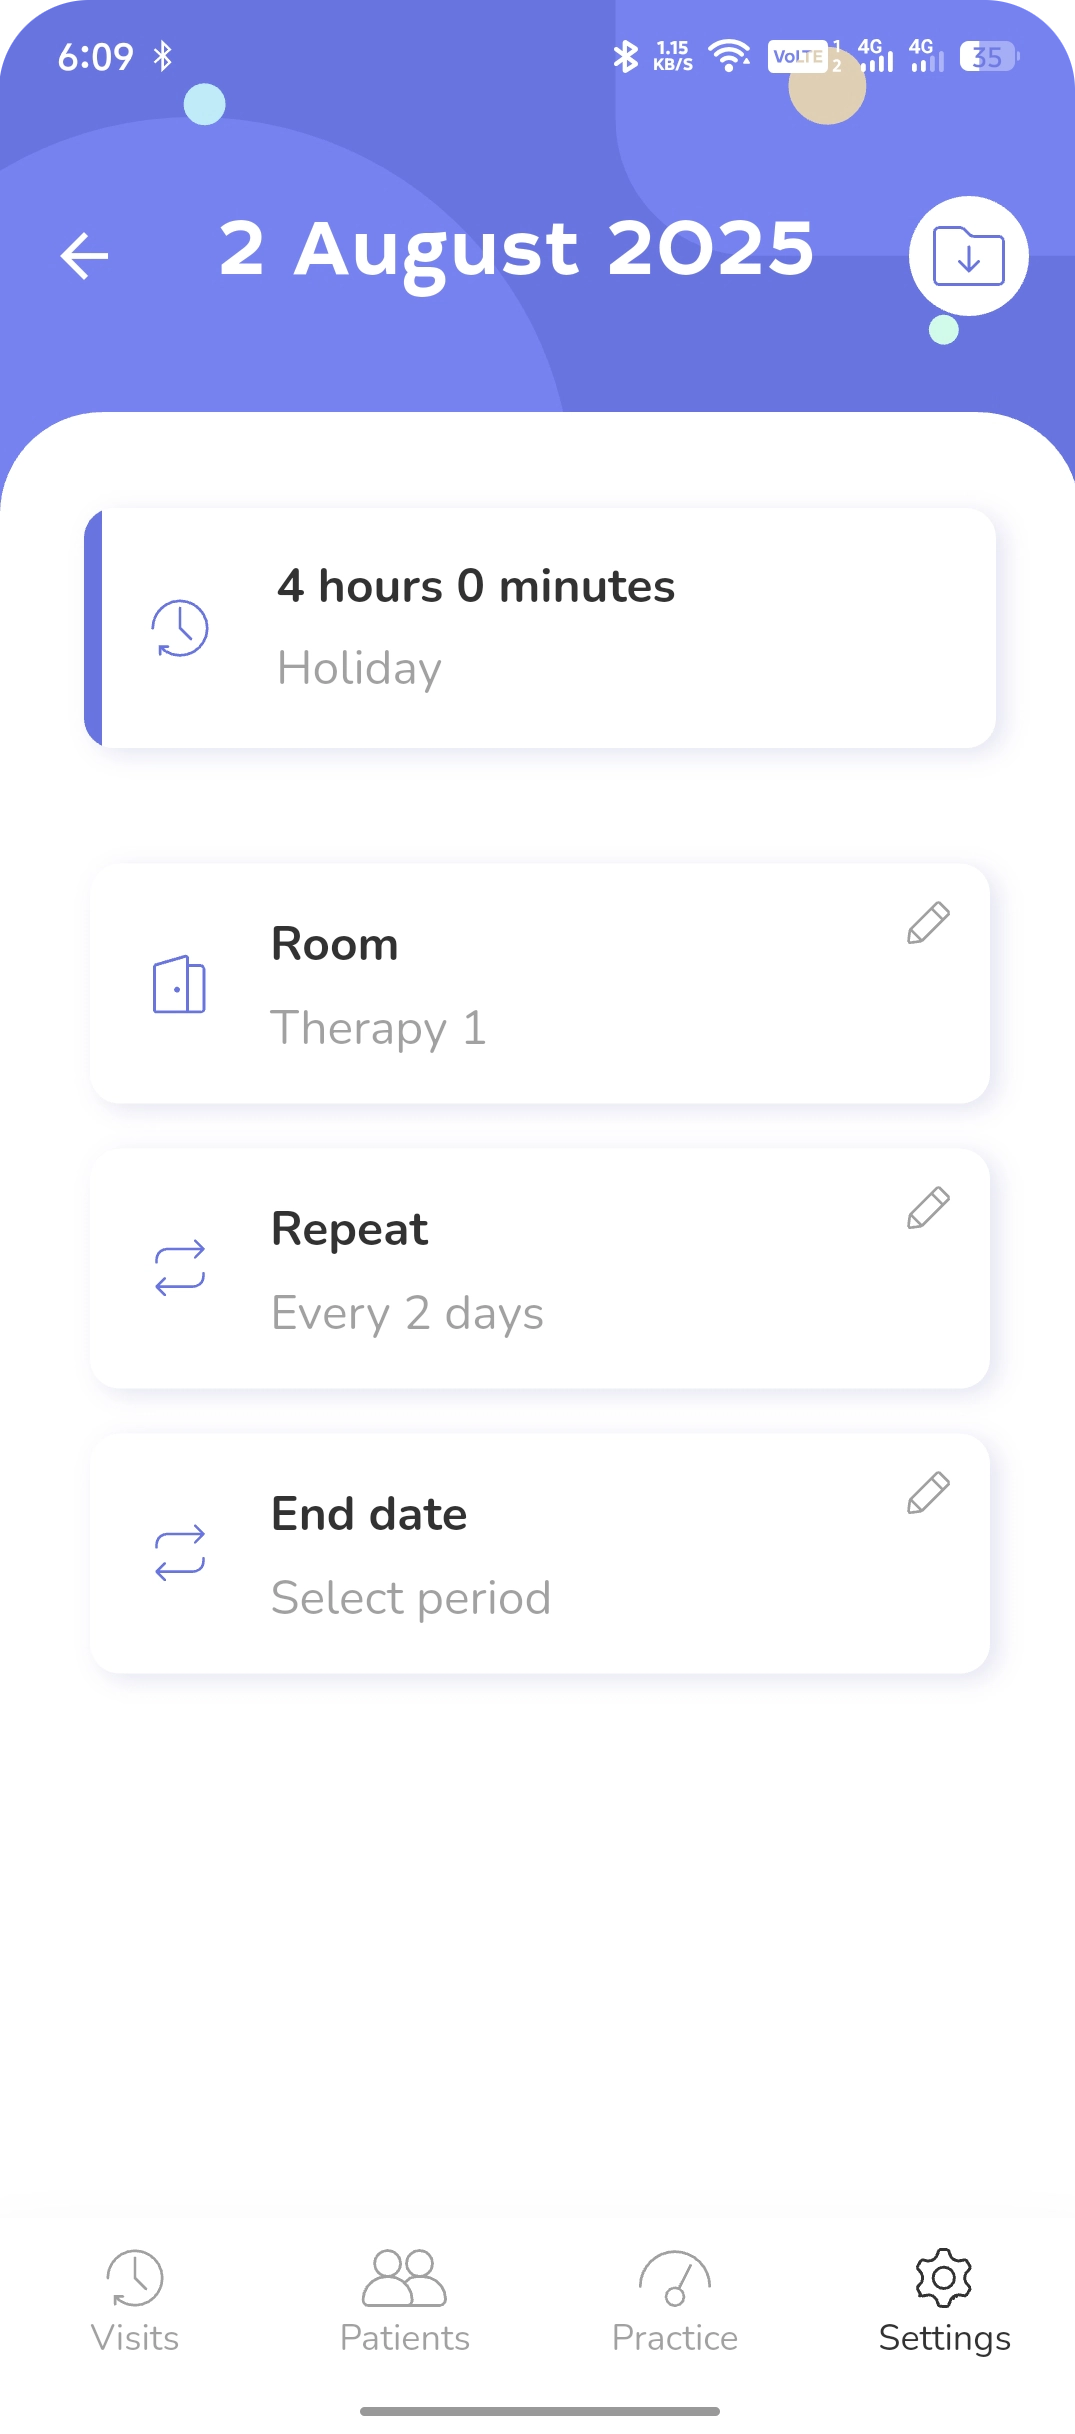
Configure additional settings for today’s workday.
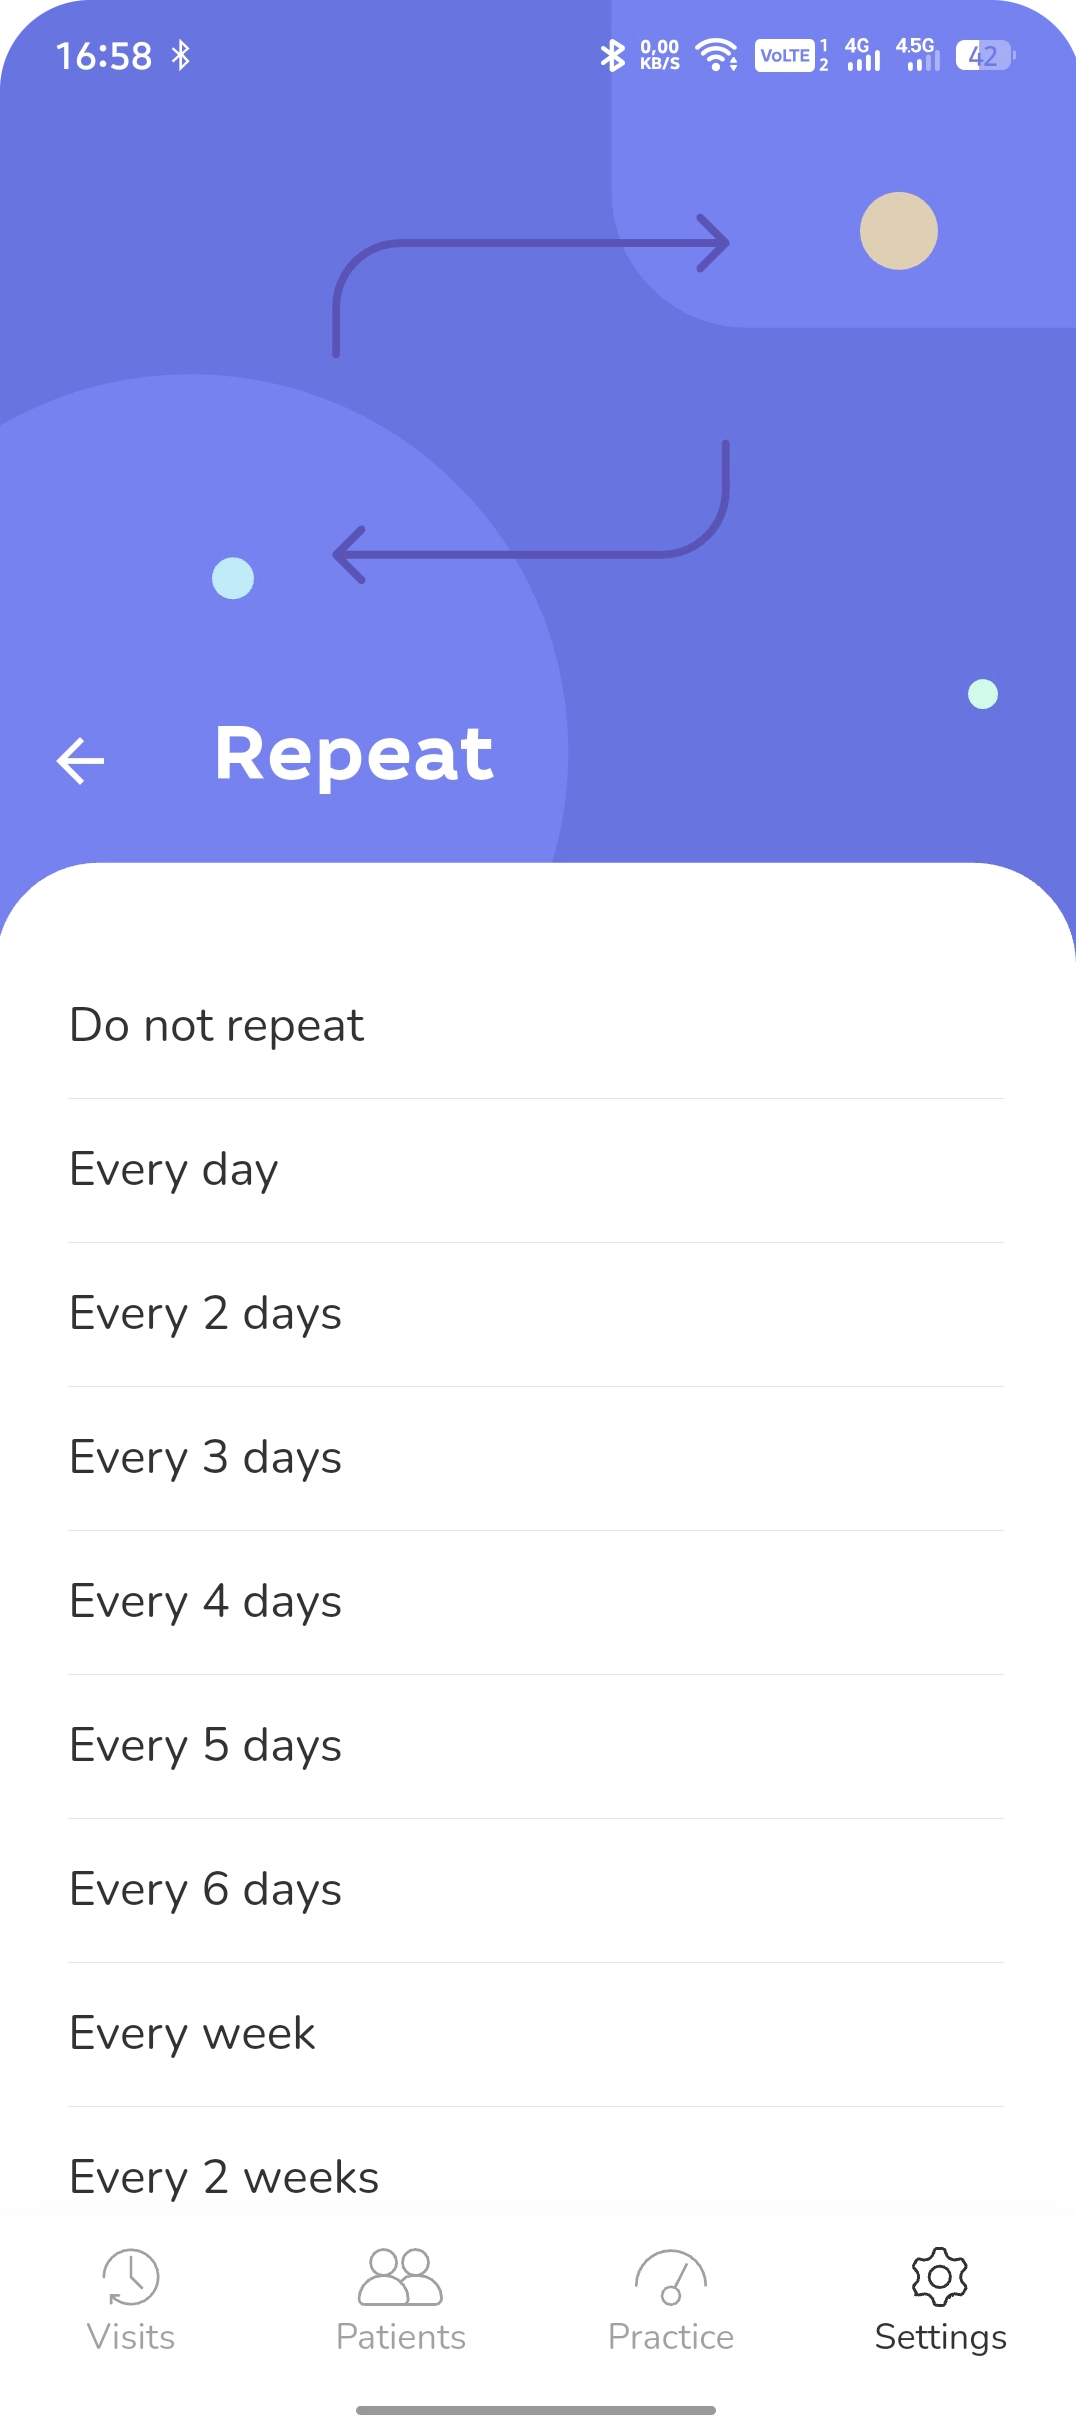
This is a recurrence pattern that can be applied to other dates.
Tasks/
You can assign tasks related to patient care.
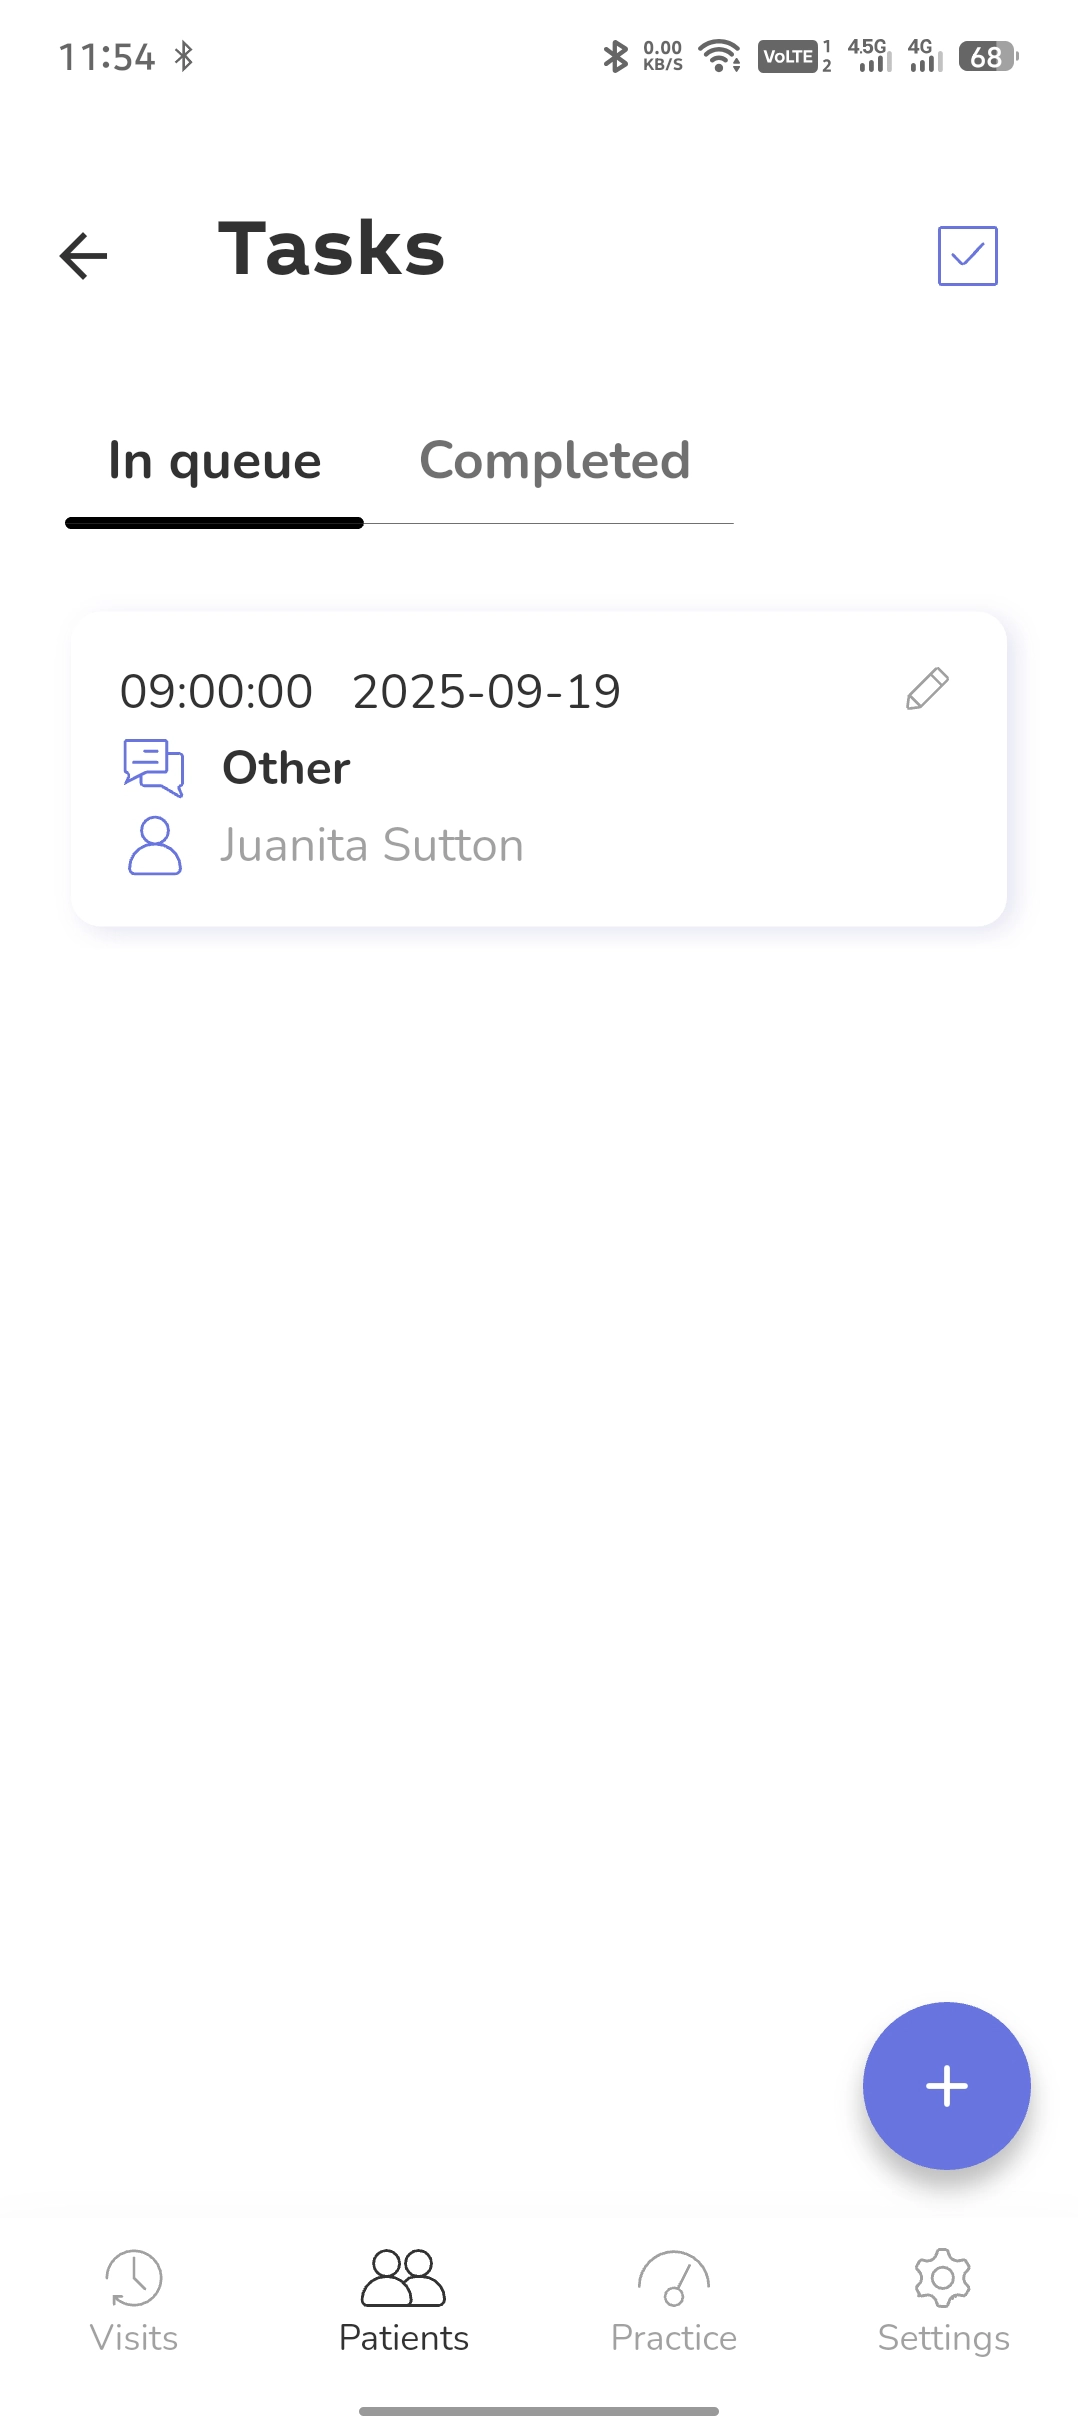
Click the + to create a new task. Tasks are located in the patient’s profile.
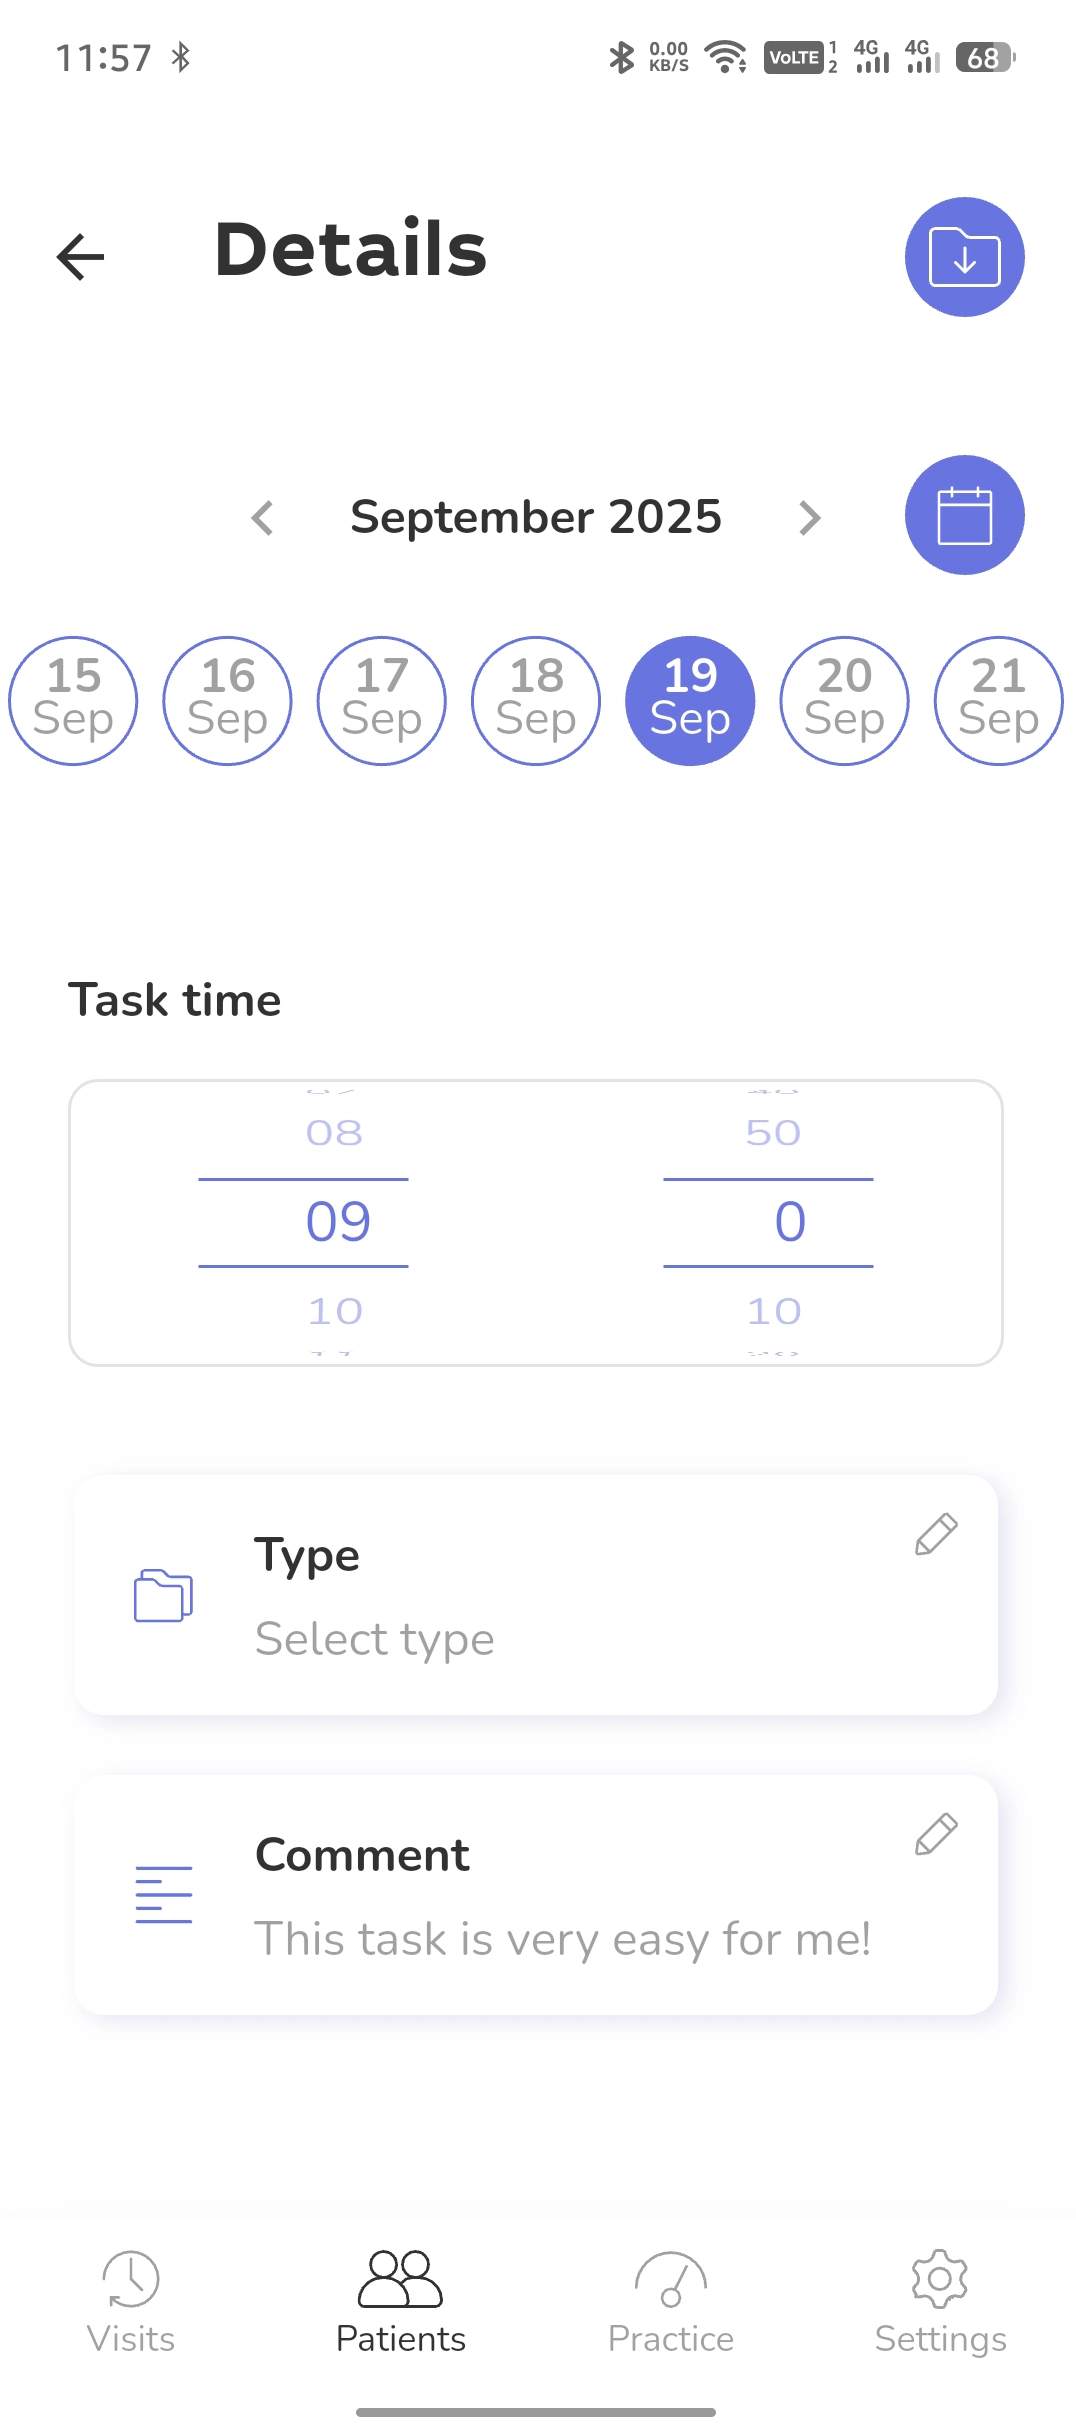
First, set the task’s end time. Then choose its type and write any relevant comments for the task.
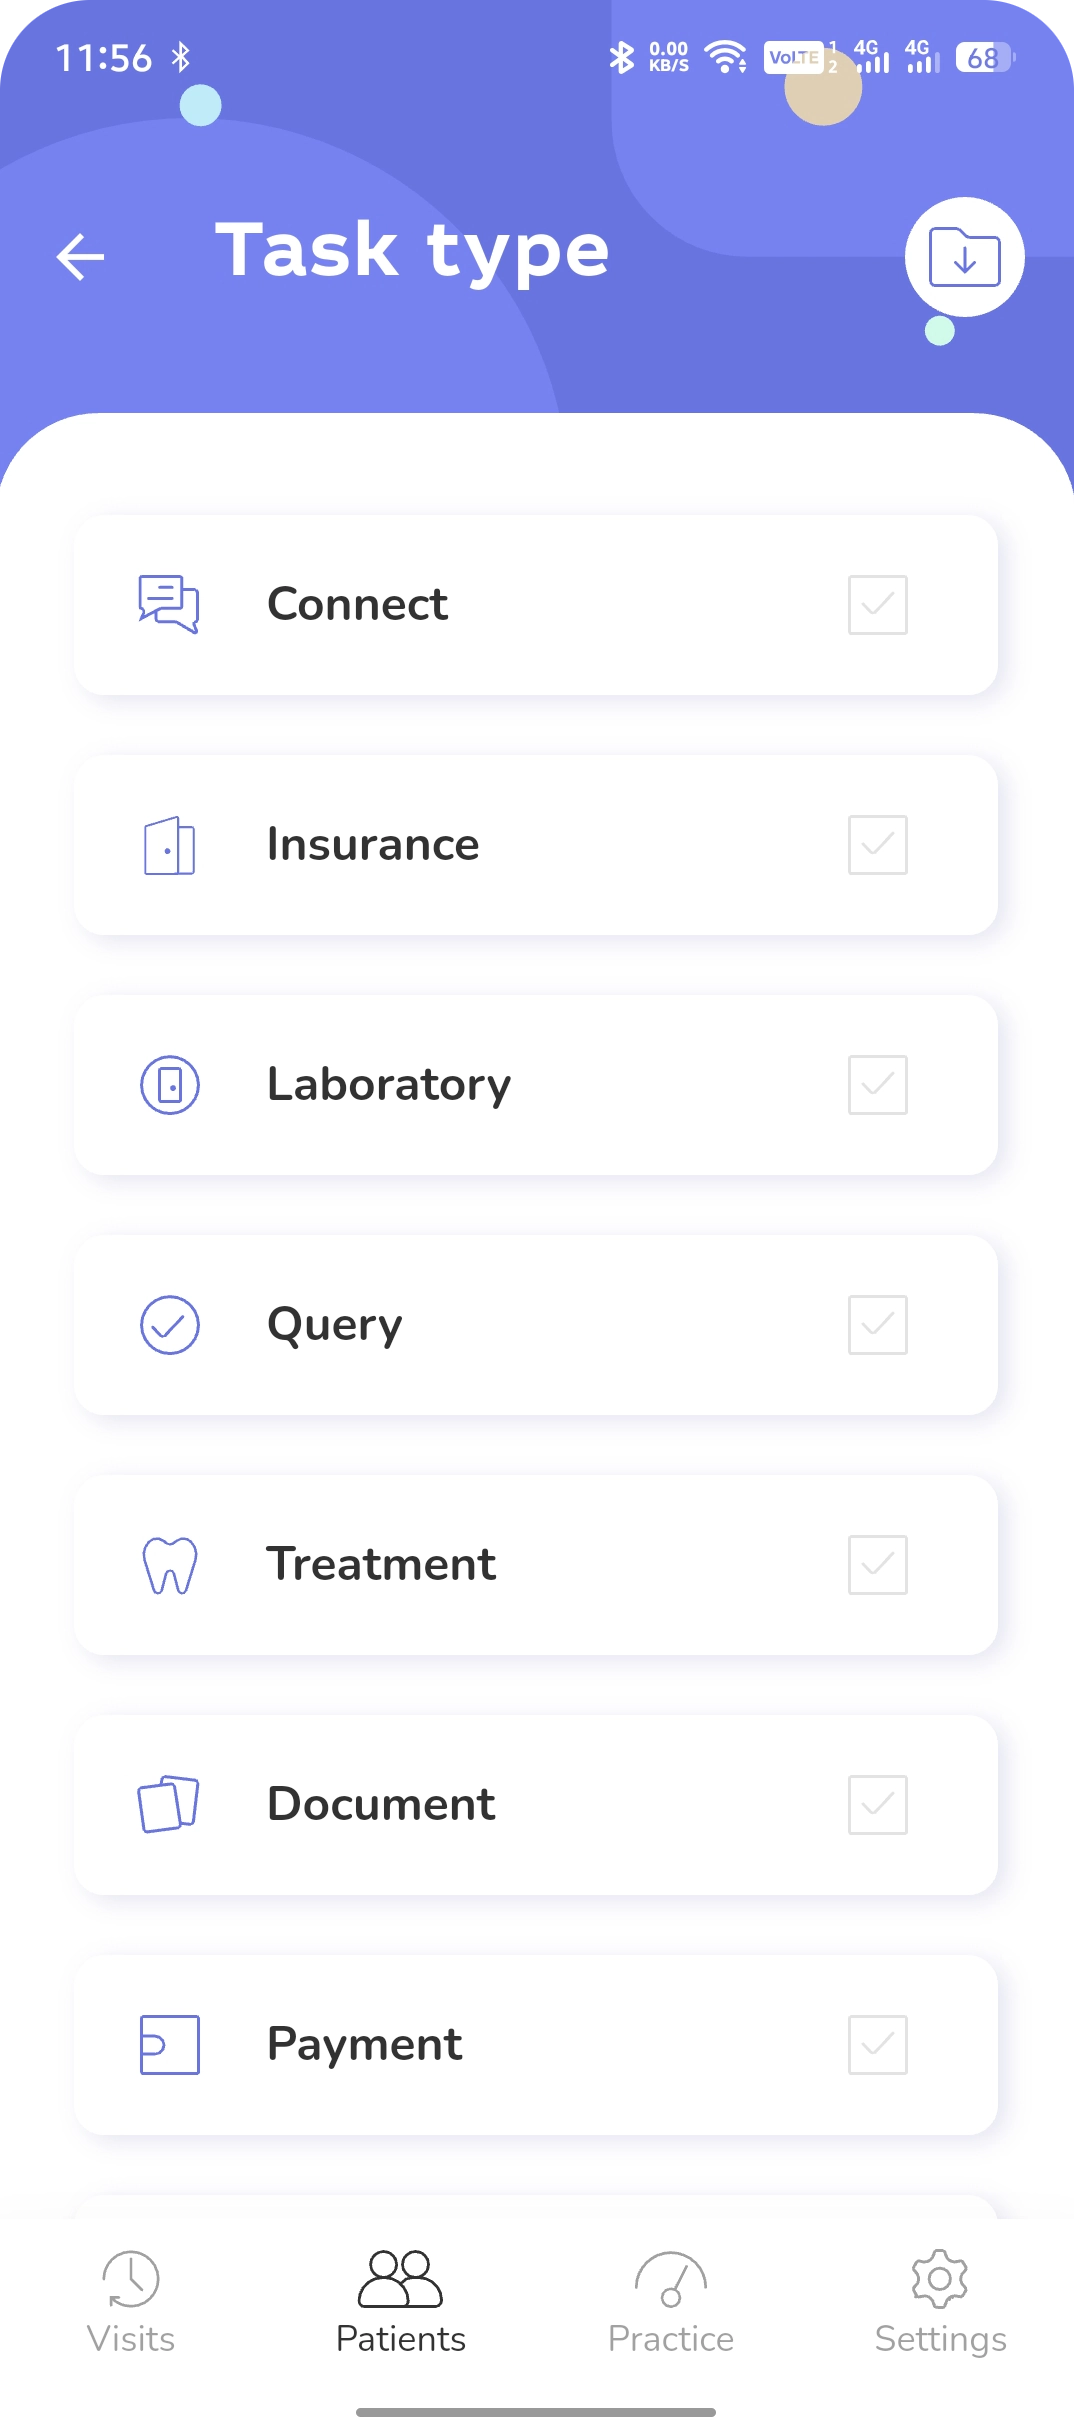
The screen shows a list of all task types. Select the desired task type or mark the task as Other.
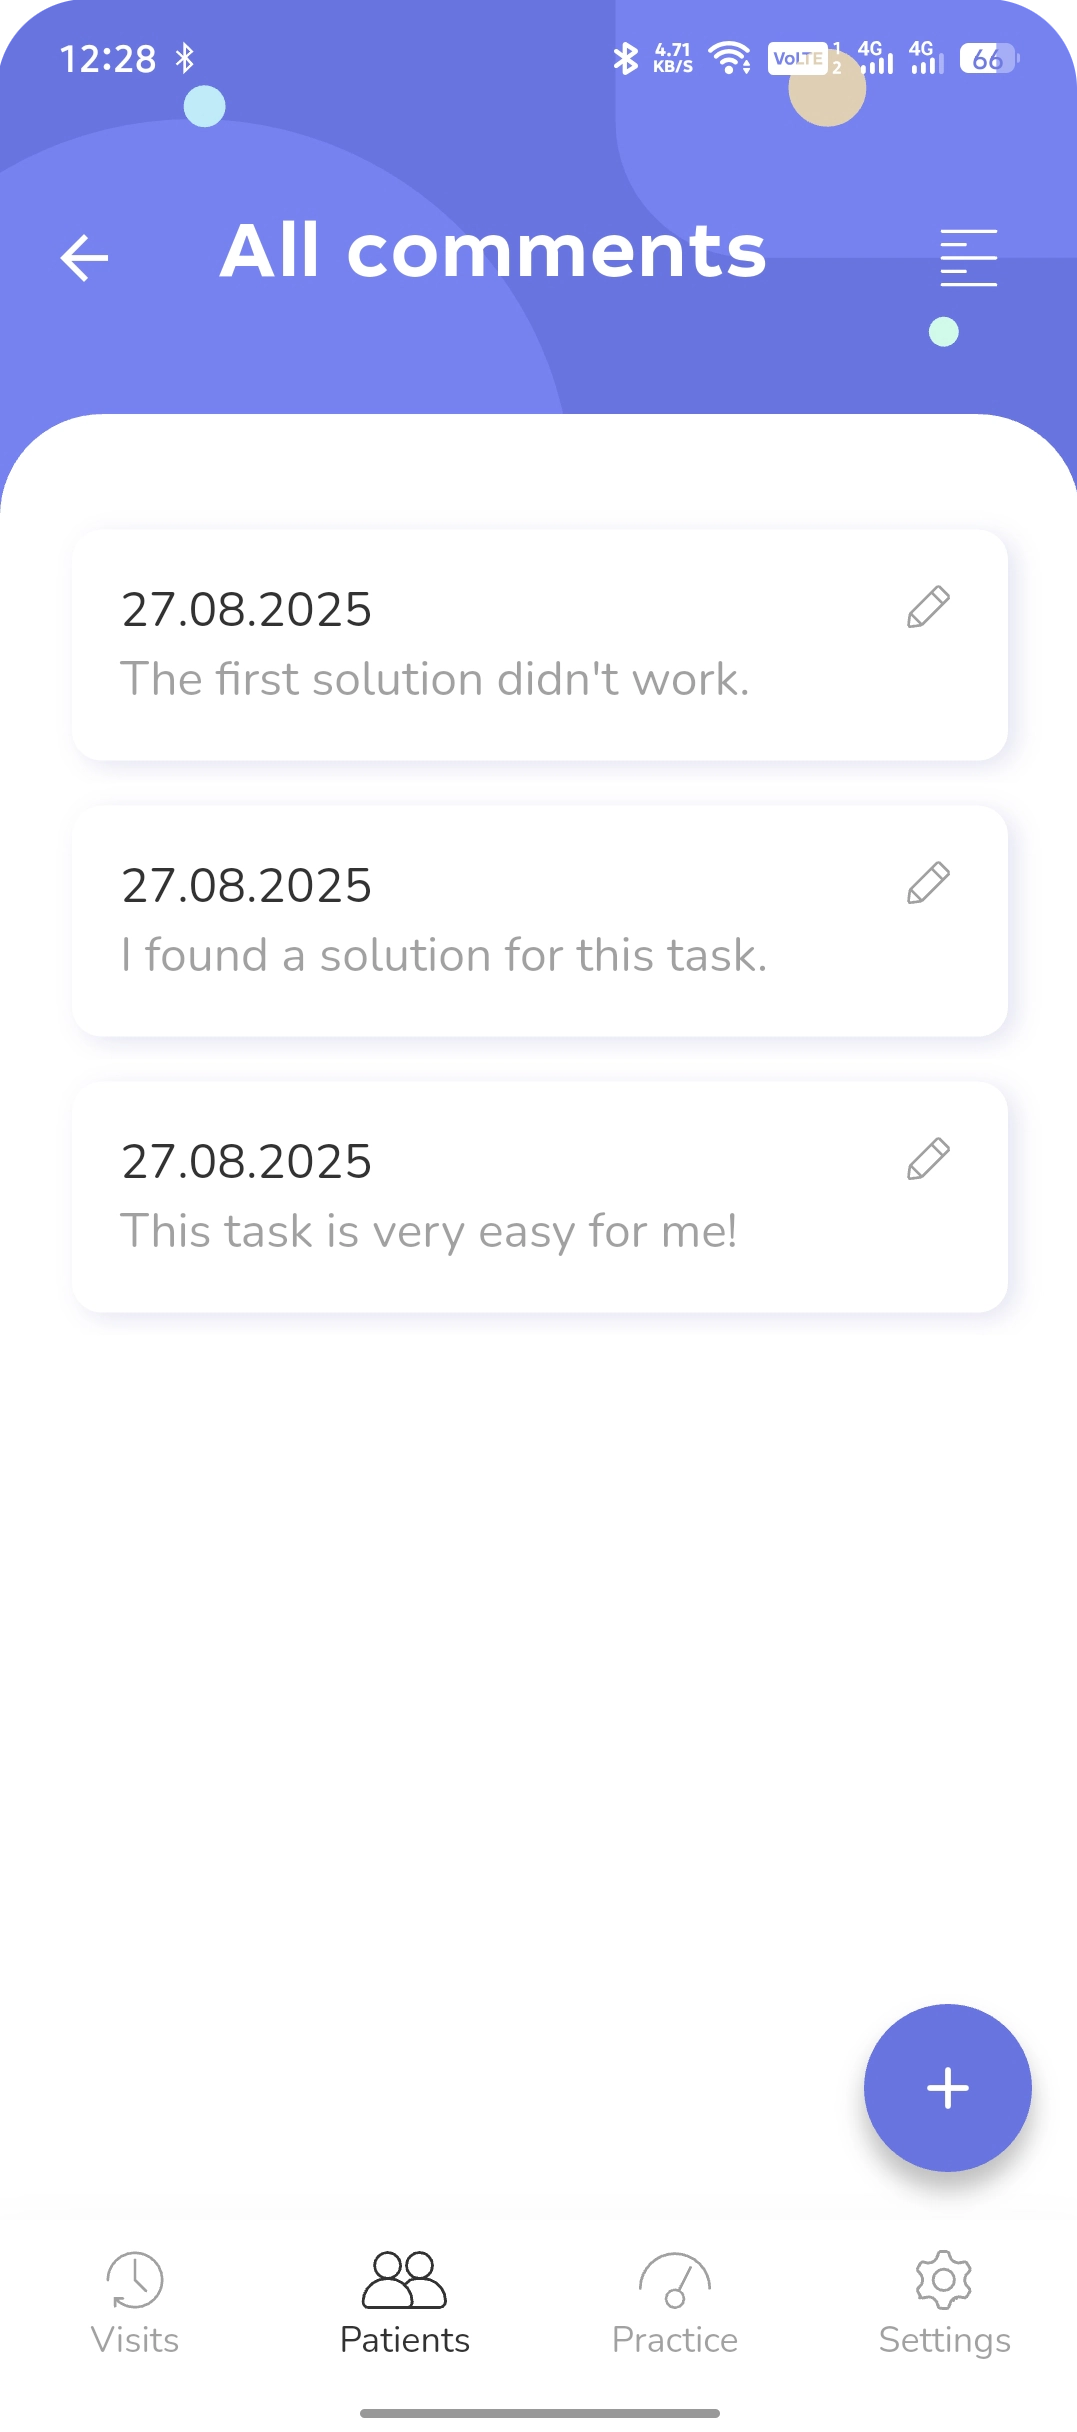
Multiple comments can be added to a single task. They can be edited or deleted.
Treatment log/
The treatment log implements detailed record-keeping of the patient’s treatment history with procedure details.
Procedures are added to the log as cards indicating the code, name, tooth numbers, quantity, and cost of the procedure.
Features of the Treatment Log screen:
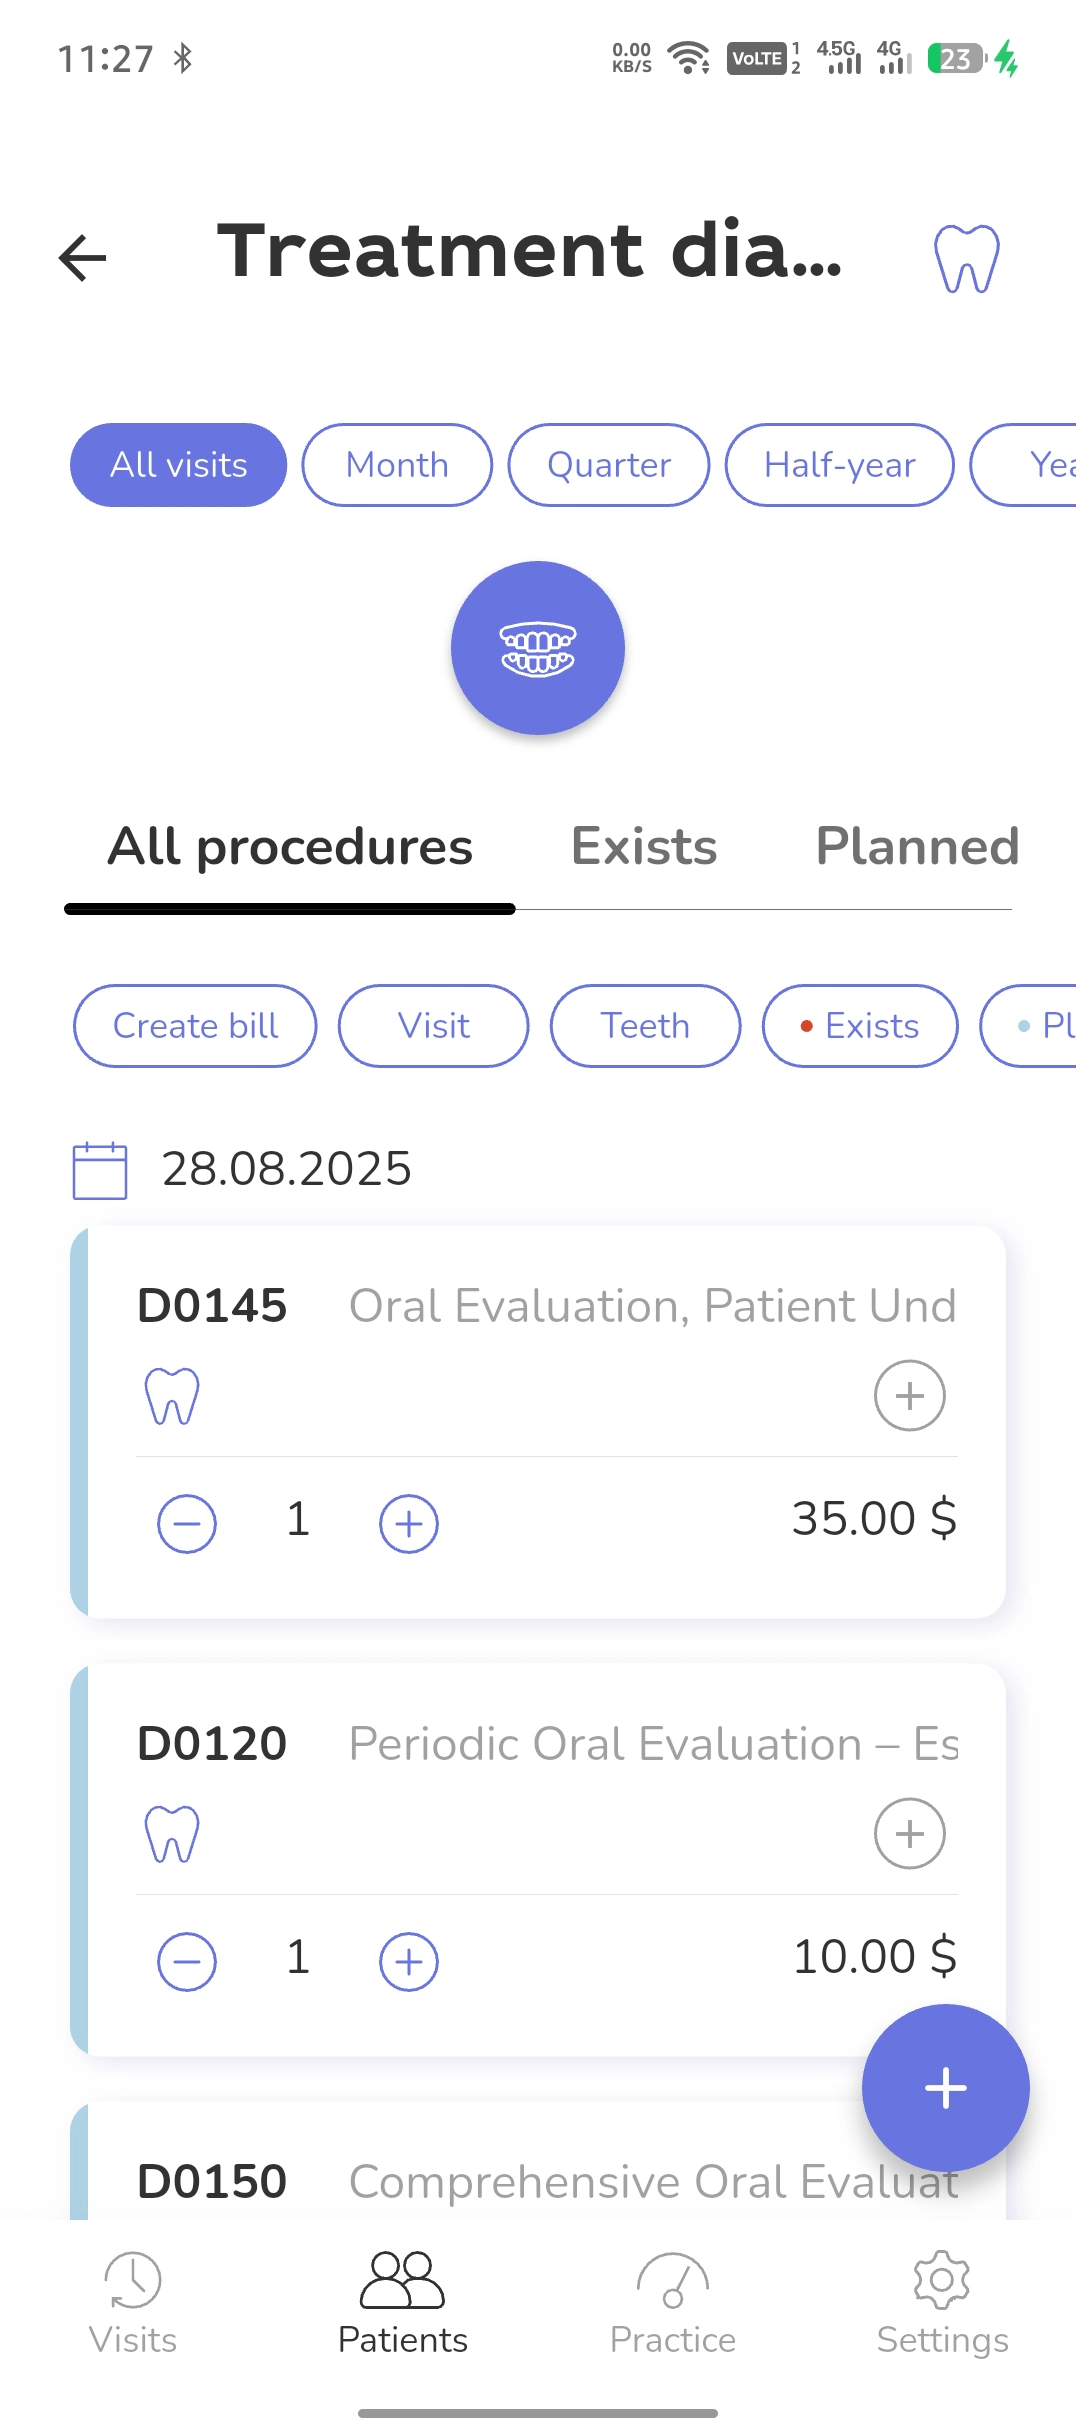
Start creating a procedure by clicking + or the Dentasl chart icon.
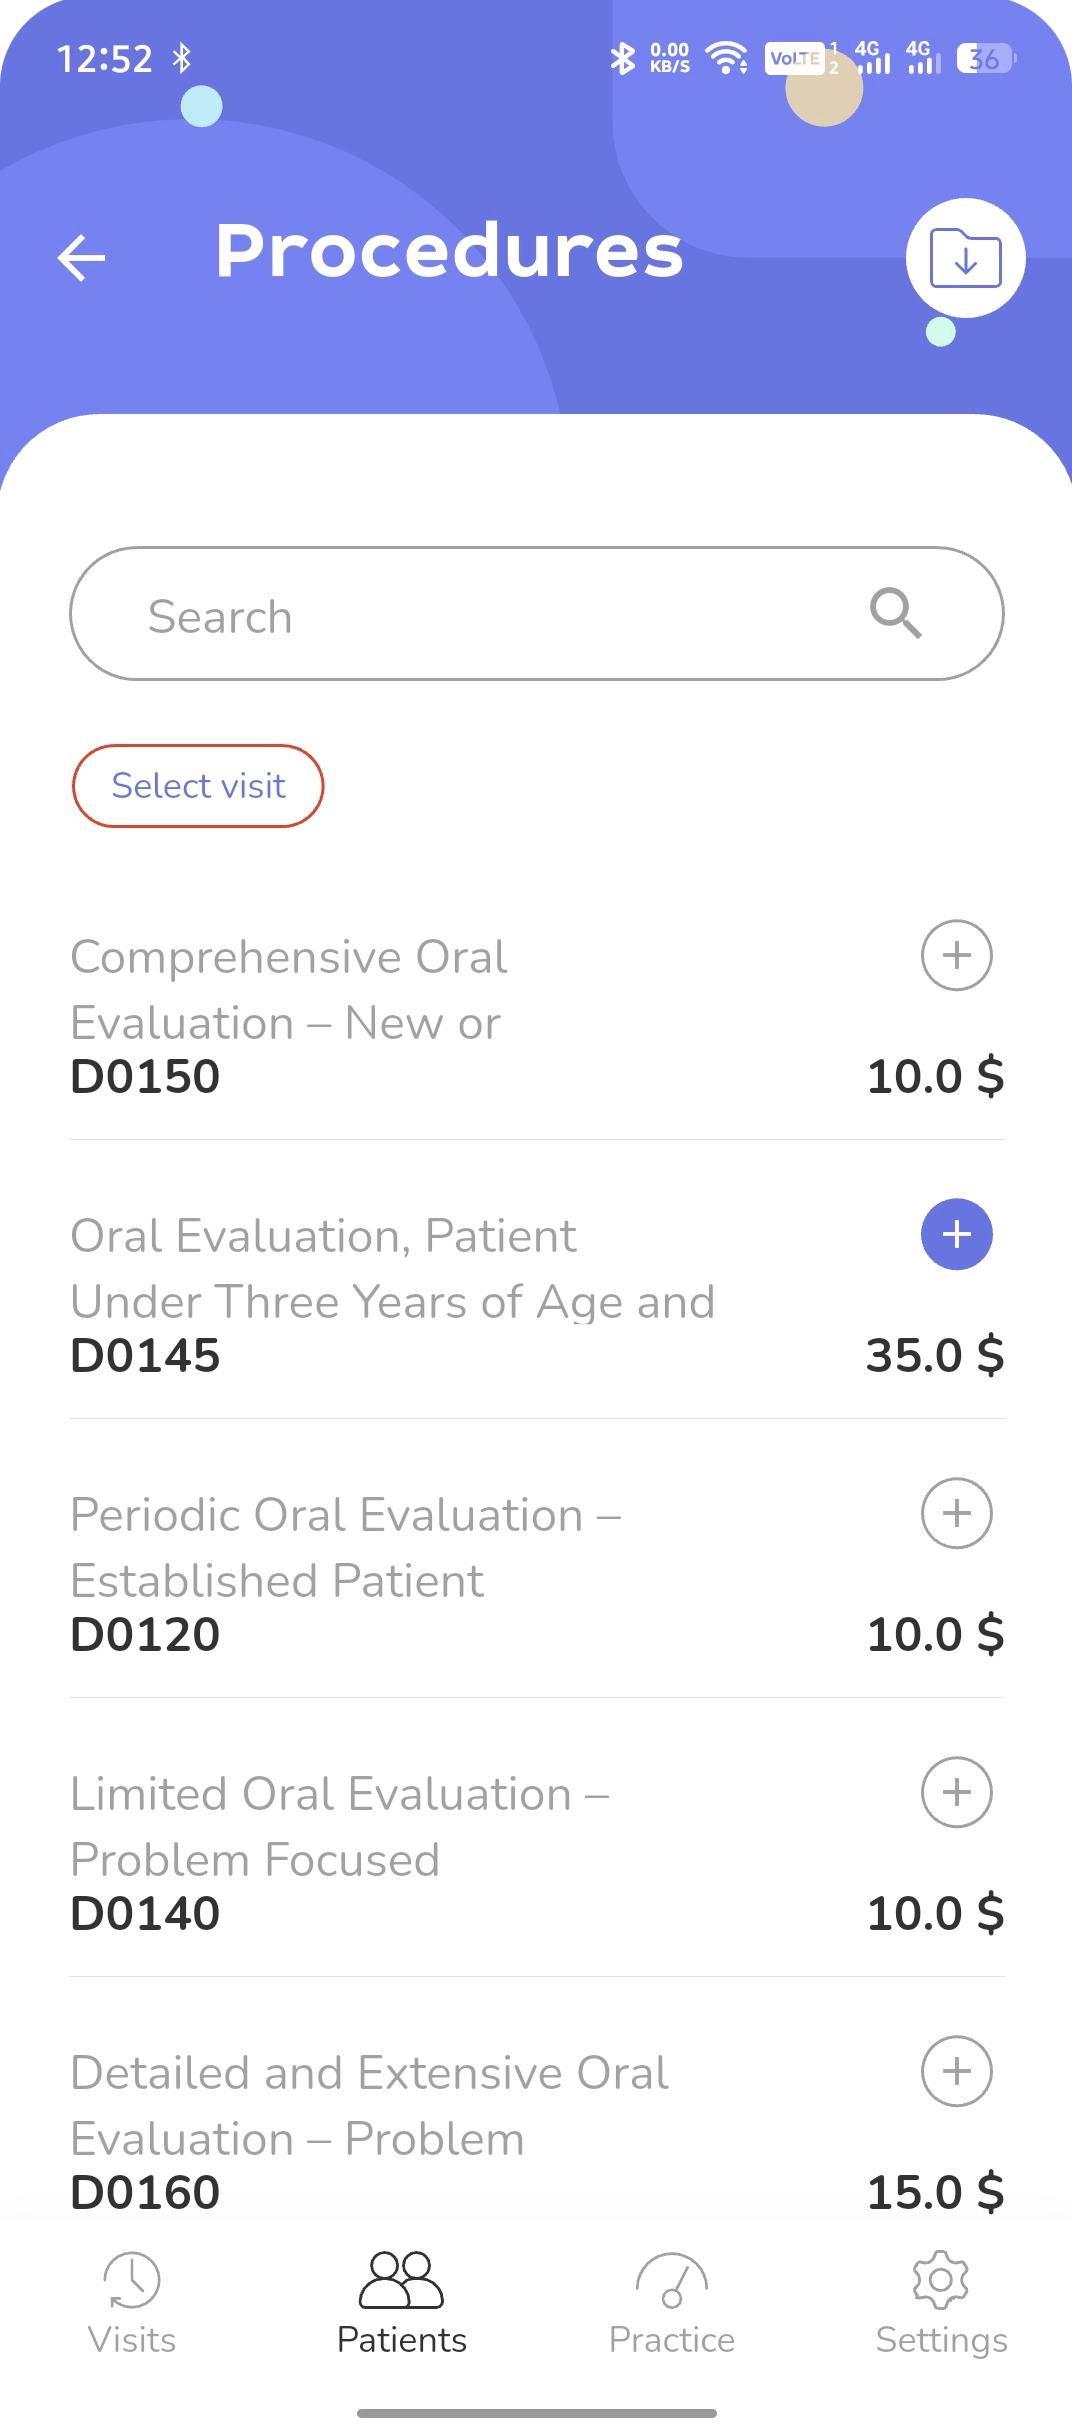
Before assigning a procedure, select an appointment by clicking the Visit button at the top of the screen.
Click the + icon next to the procedure, then click the Save icon at the top of the screen.
You can find the procedure for any character from it in the Search window.
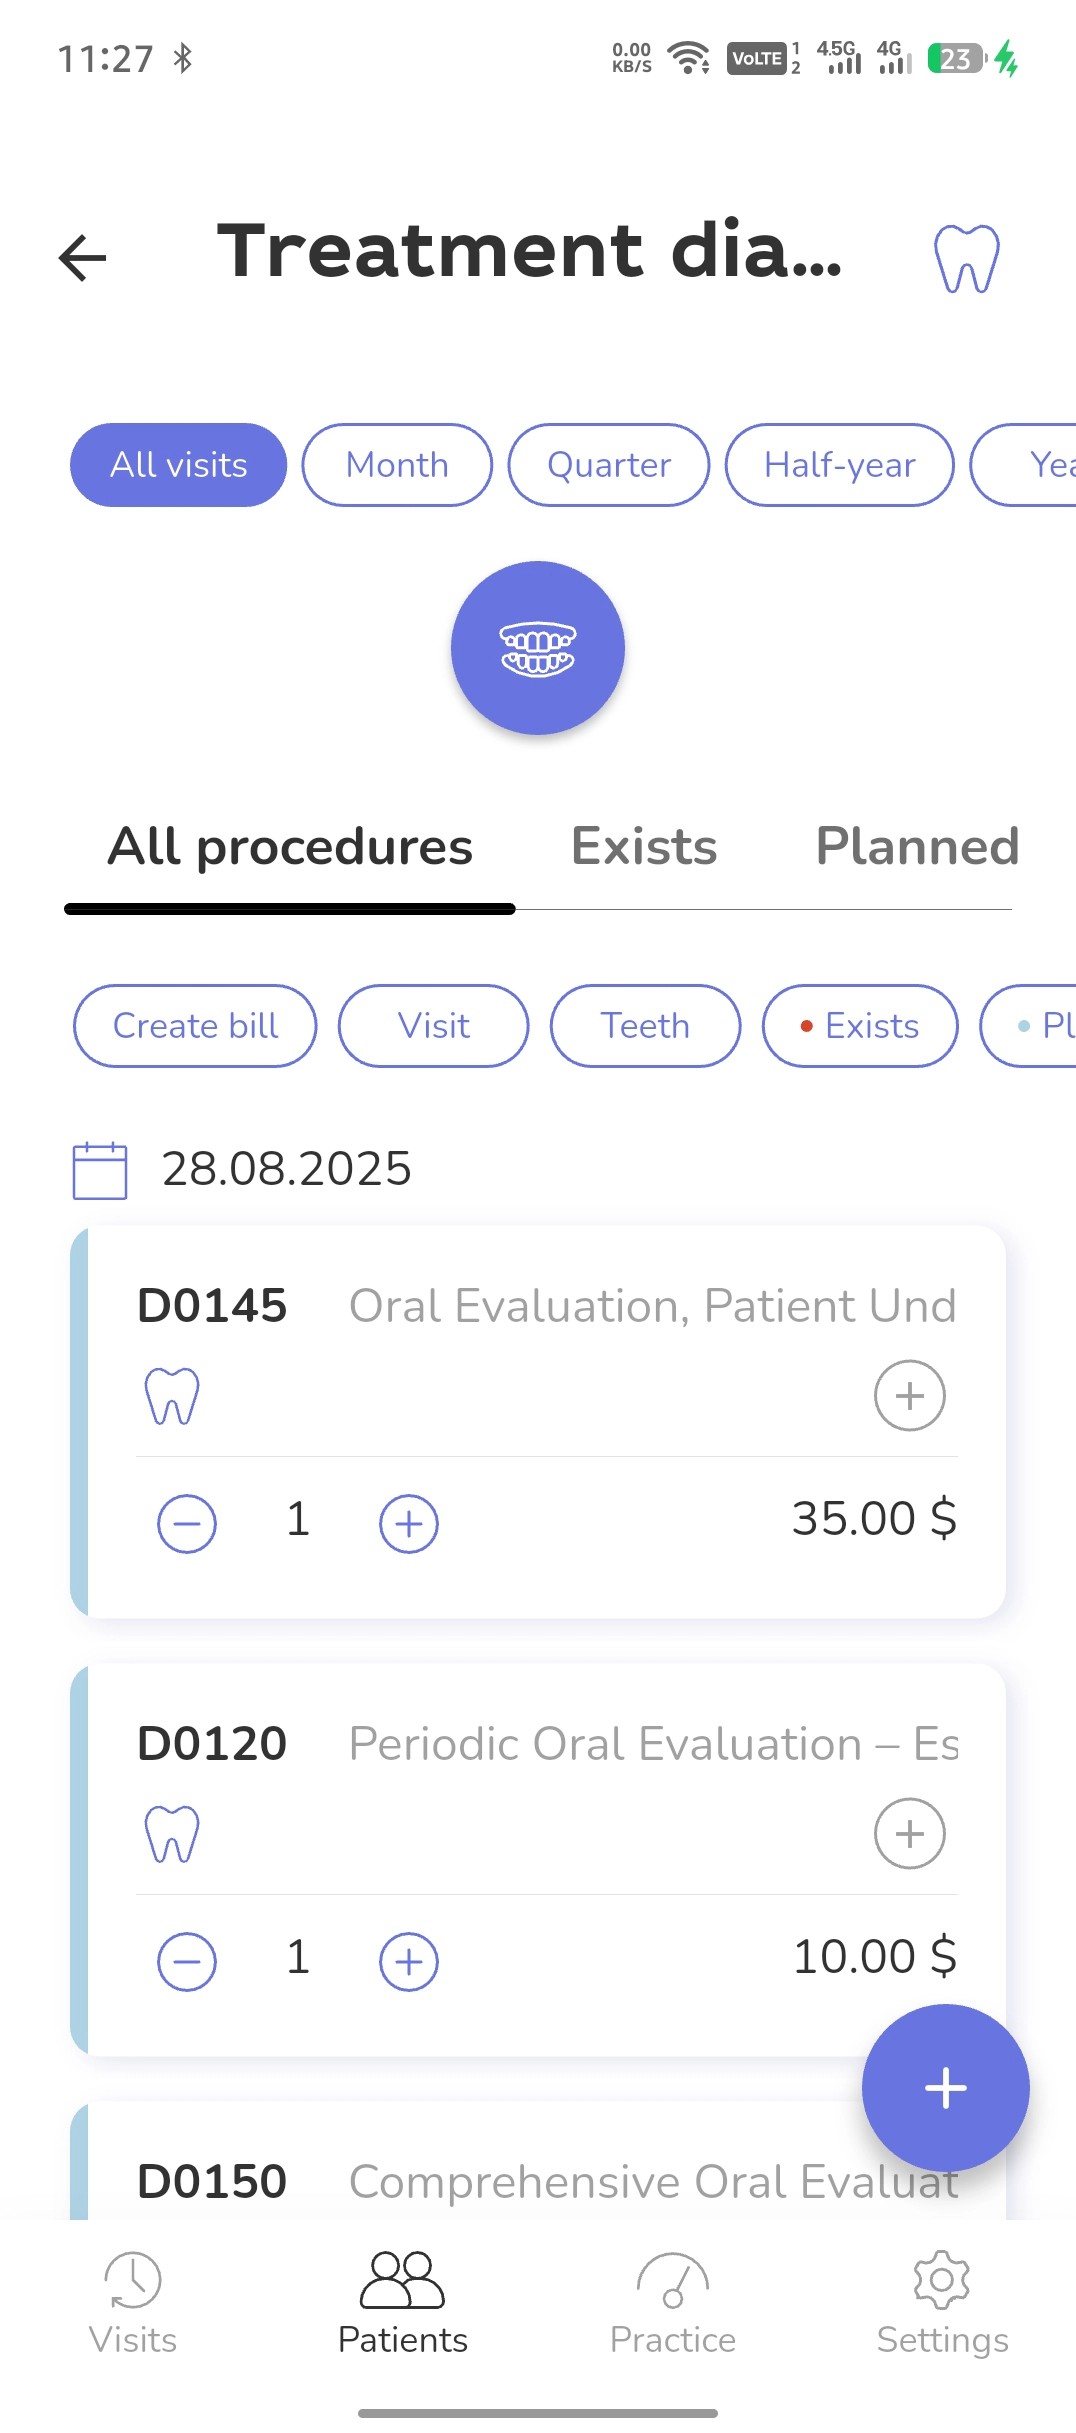
Swipe the card to the left to access procedure actions.
For group actions on procedures from the list, select the needed ones using the + icon. Then use the controls at the top of the screen.
Invoice/
The list of patient’s accounts is in their profile. Look for this icon that looks like Blinky (Pac-Man).
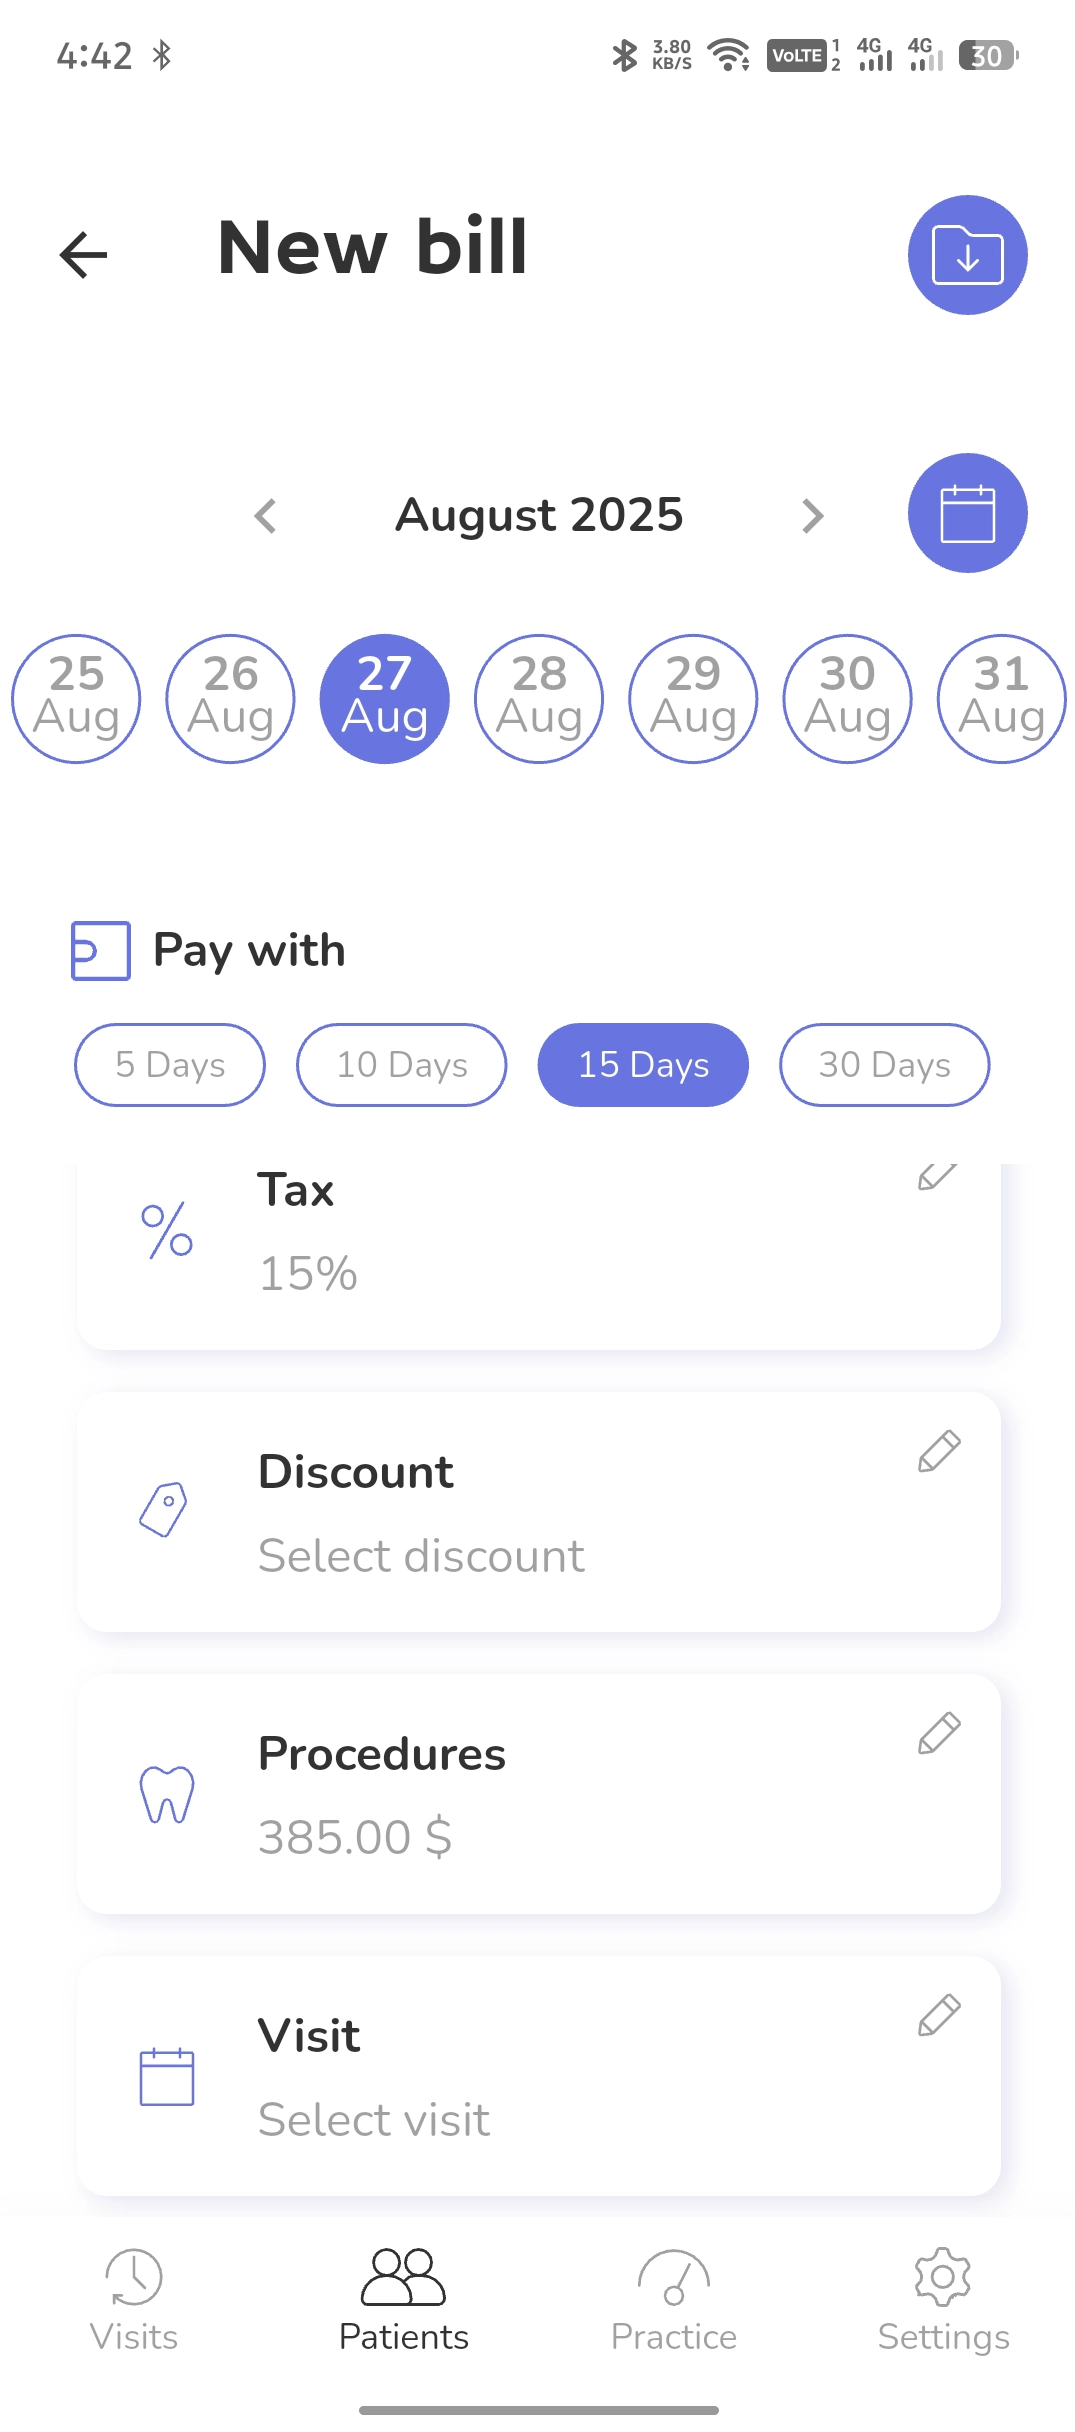
Select the invoice date or use the mini-calendar.
Select the payment period for the invoice from the options provided.
Fill in all the required information in the invoice fields and click the Save icon at the top of the screen
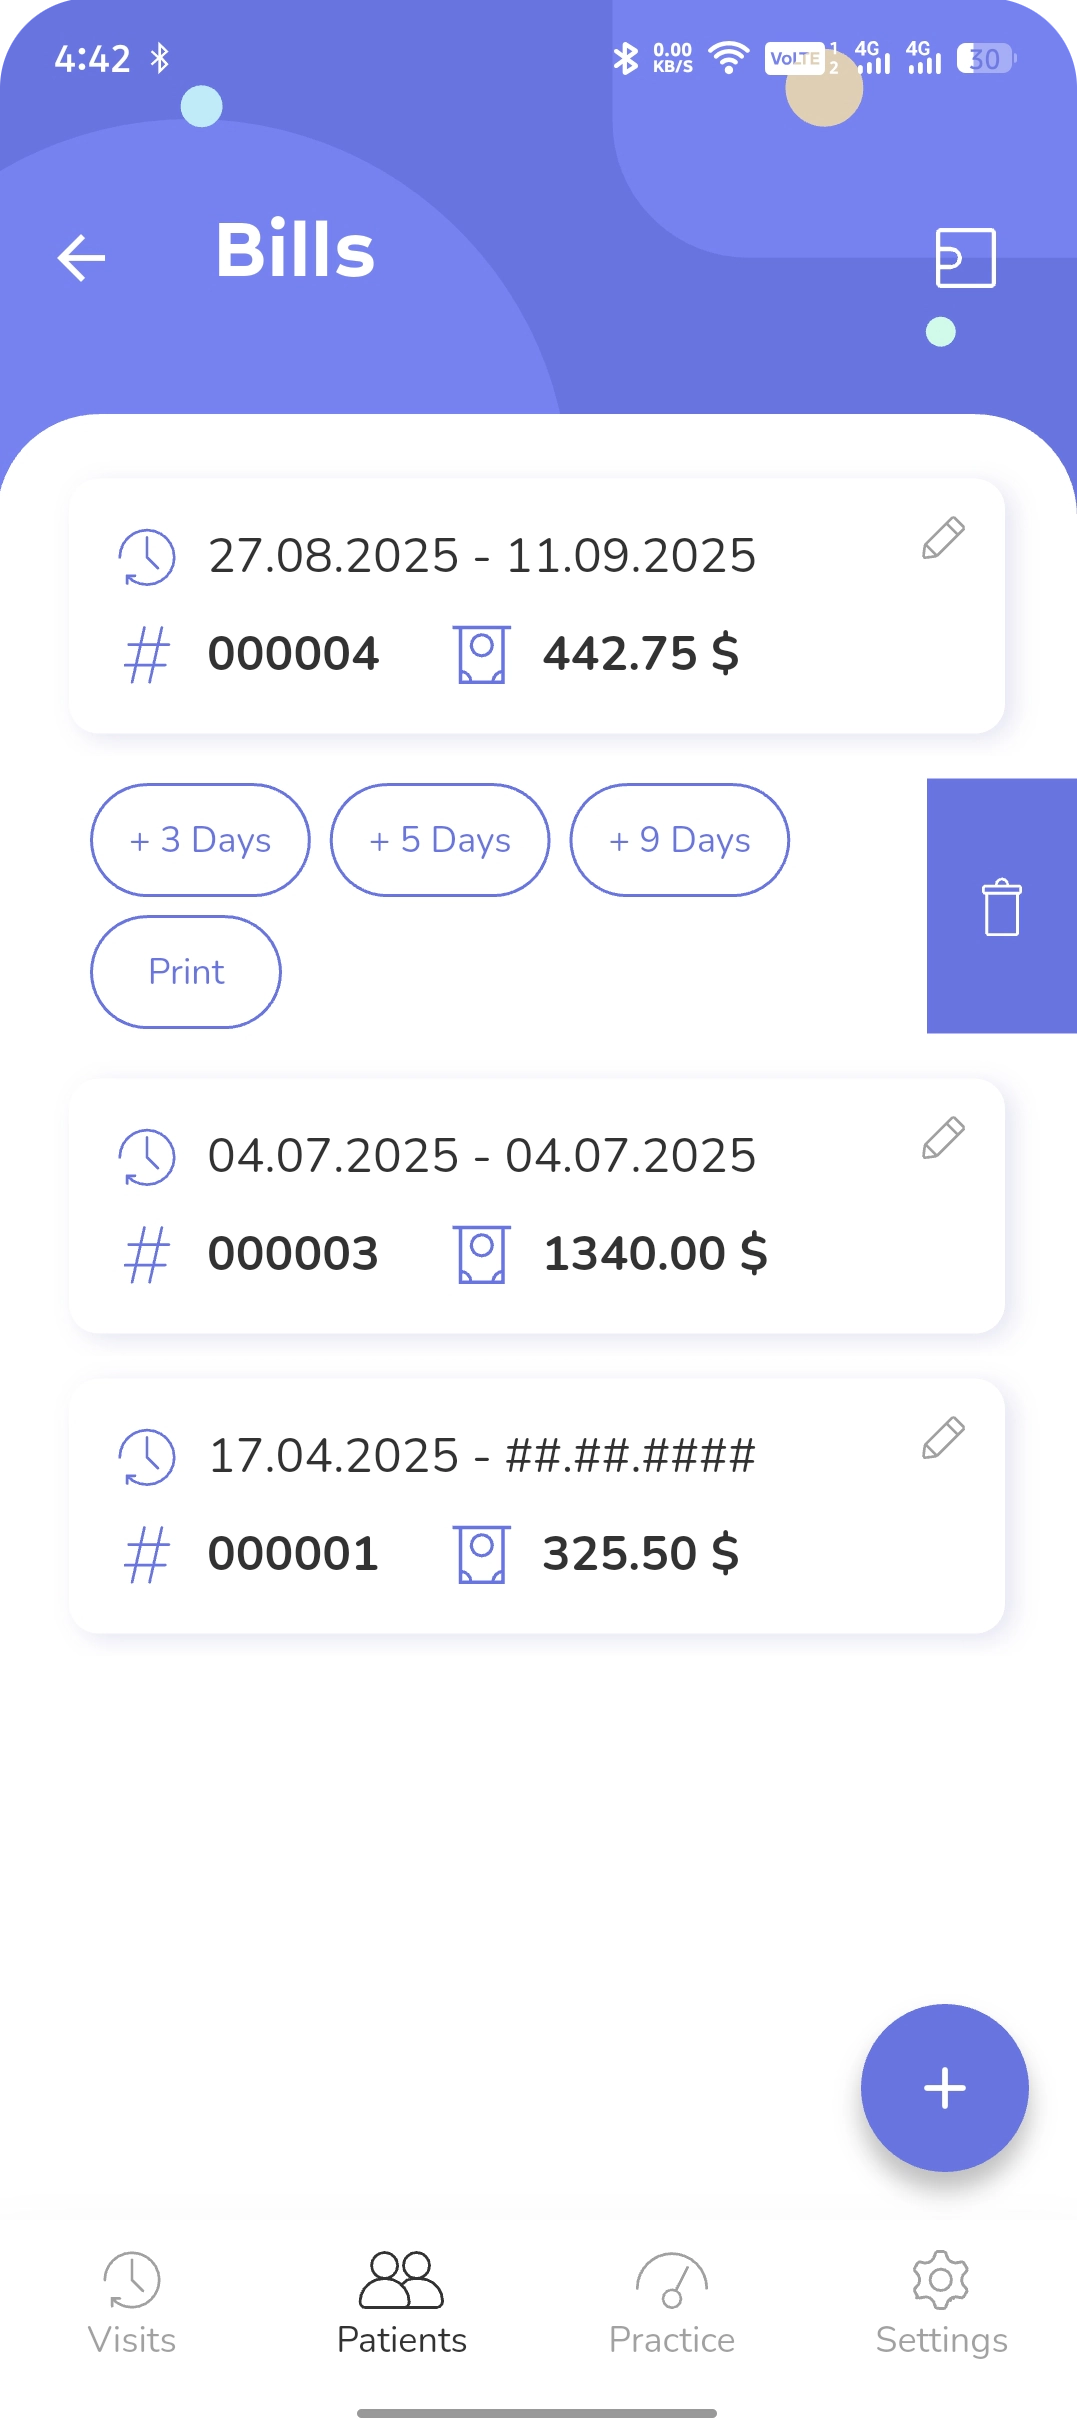
To delete an invoice or change the payment period, swipe the invoice card to the left in the invoice list and select the desired action.
Payments/
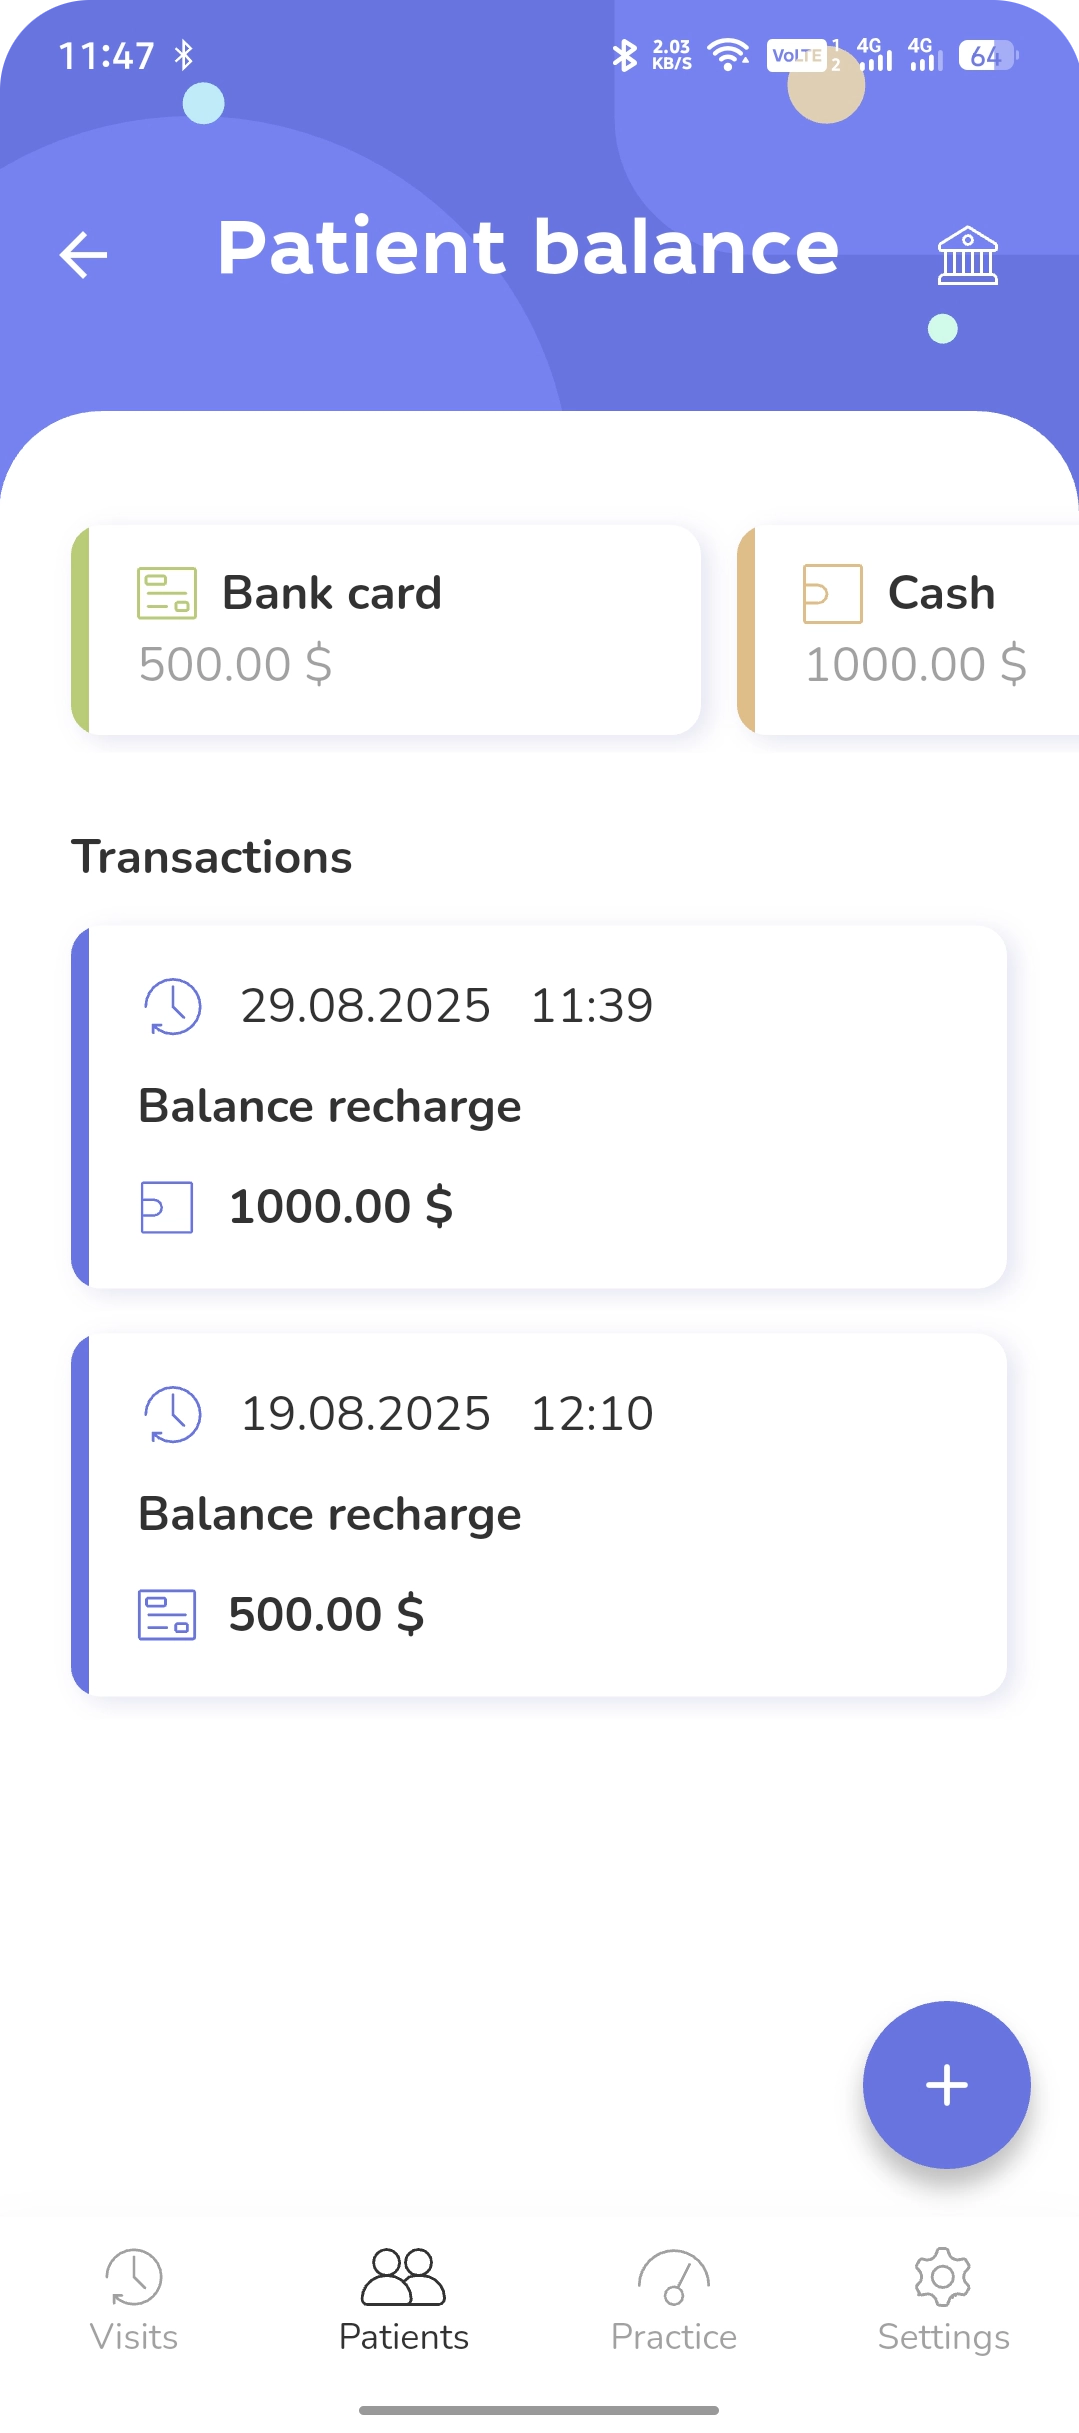
In this part of the mobile app, you can manage the patient’s balance and payments.
Payments balance/
To start, top up the patient’s balance.
To do this, tap the + icon and go to the Add payment screen of the app.
After topping up the balance, you will see the amount and the top-up method in the horizontal row of cards.
Balance Top-Up/
Select the Recharge menu item and the top-up method. Enter the top-up amount. You can also choose a group. Save the entered data.
The balance top-up amount will be displayed in the Advance card in the patient’s profile
Balance Deduction/
In various dental practice situations, you can deduct funds from the patient’s balance. To do this, select the Withdraw tab, choose the type, and enter the deduction amount.
The action will be displayed in the balance transaction list
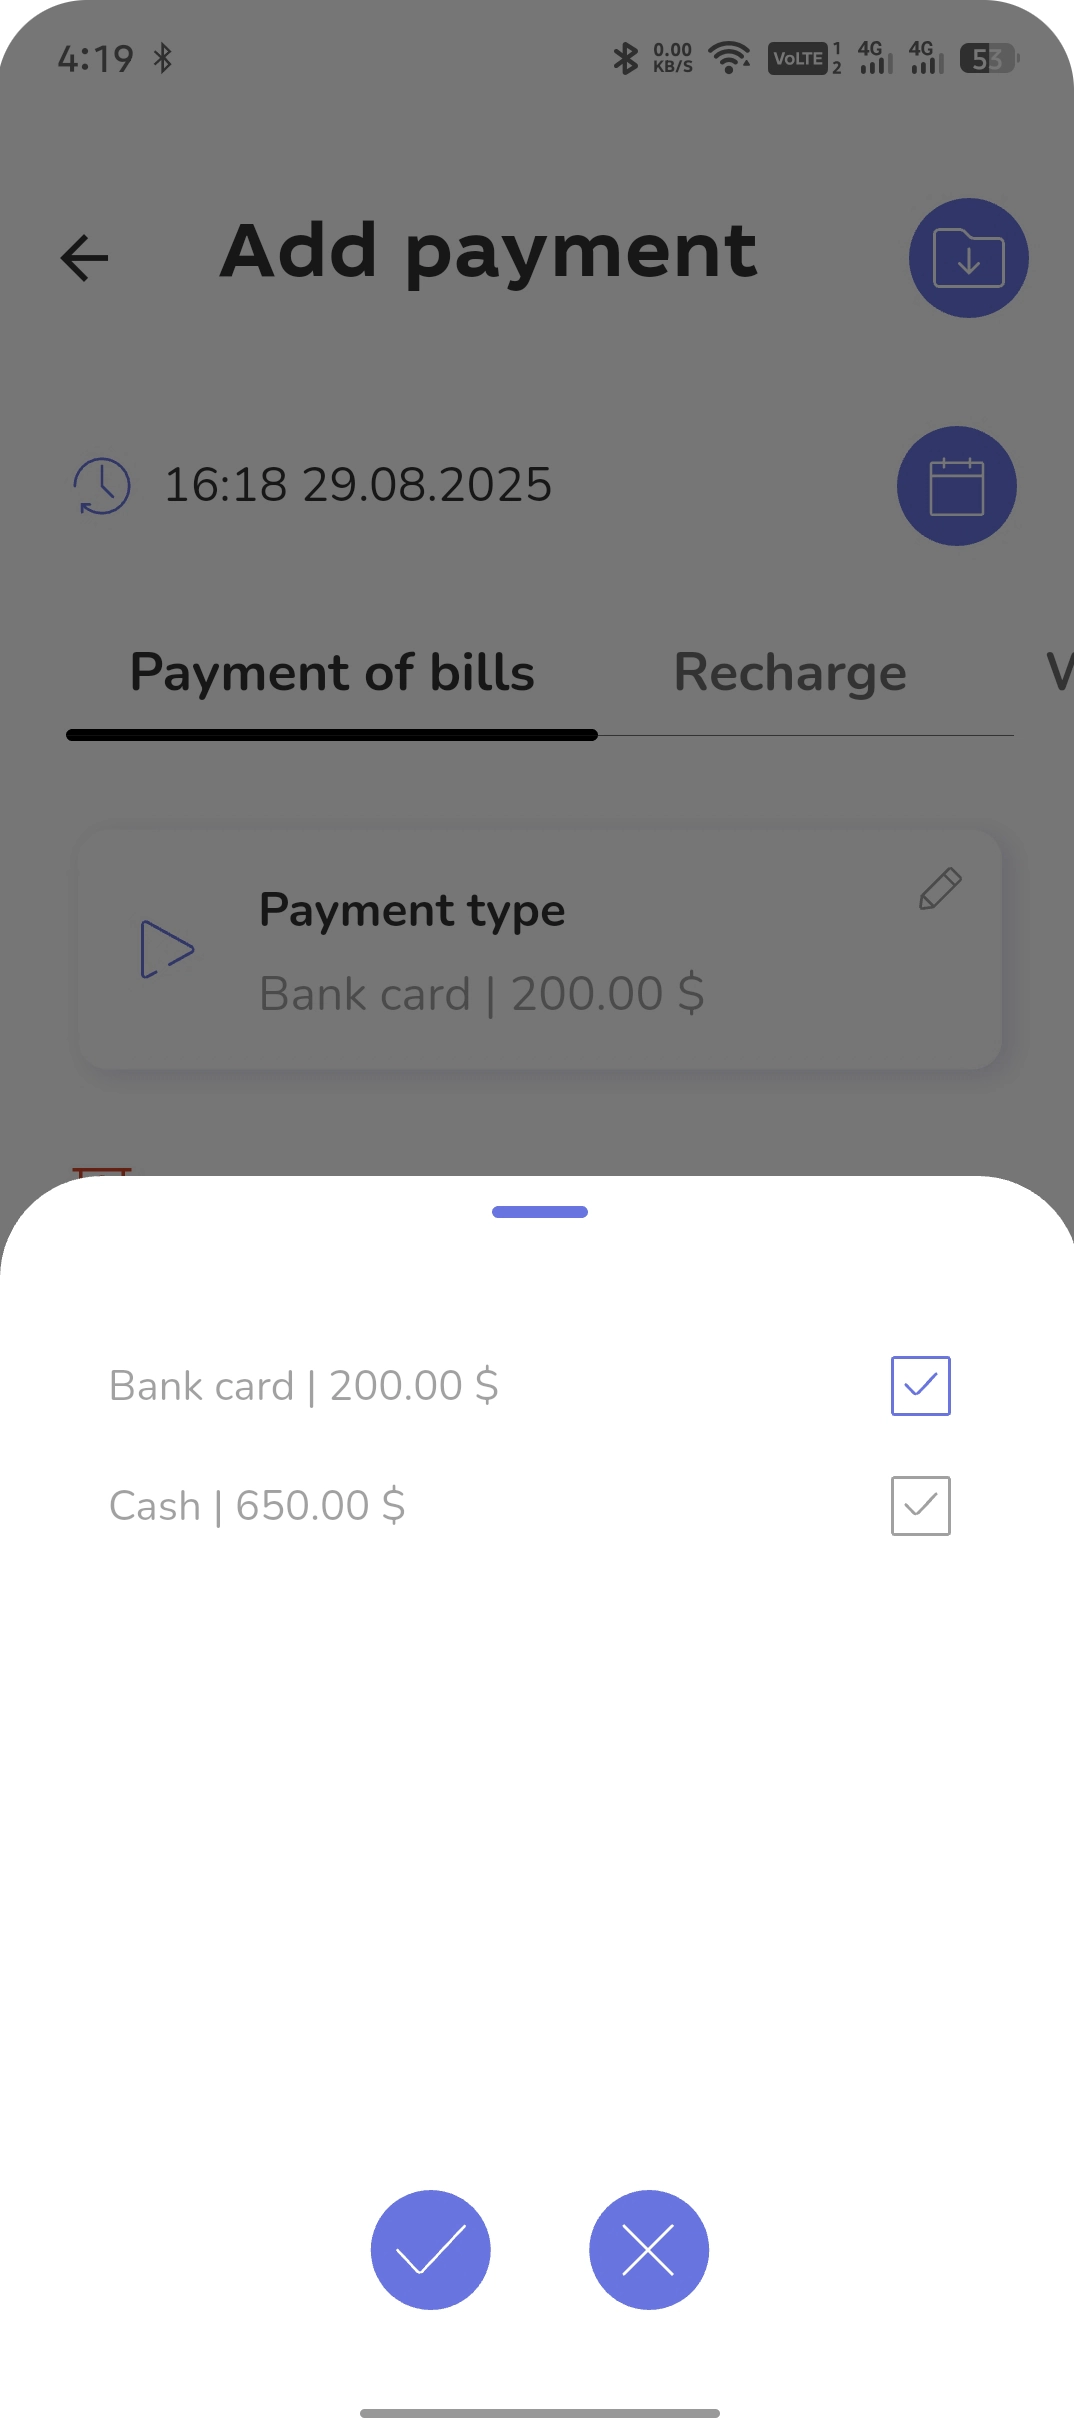
Please note that patient funds can only be deducted from one top-up type, for example, from a credit card or cash.
Balance Transfer/
You can transfer funds from one patient’s balance to another patient’s balance.
Select the Do Transfer tab in the patient’s billing. Choose the top-up type, the recipient patient, and enter the amount.
Invoice Payment/
To pay an issued invoice, select the Payment of Bills tab, choose the balance top-up method, enter the payment amount, and save the operation.
Note/
For each operation involving the patient’s balance, you must select one of the top-up methods you used – for example, Cash or Bank Card. Funds will be deducted from the balance specifically from that top-up method.
Other app features/
We are updating this page, and additional information will be available here very soon.
We are in the Top 10 dental software programs for 2022.
